
In the high-stakes world of burglary and intrusion protection, one mistake in system design can cost a bank, jewelry store, or warehouse millions — or worse, lives. Facility managers, security engineers, and procurement leads responsible for protecting valuable assets know this reality all too well. Traditional landline systems fail during outages or deliberate cuts. Single-zone setups leave blind spots that intruders exploit in seconds. That’s why a properly engineered multi-zone GSM alarm system has become the non-negotiable standard for high-risk commercial environments.
This ultimate engineering guide walks you through every critical decision in designing a GSM alarm system that delivers layered, reliable, remote-capable protection. Whether you’re specifying equipment for a new bank branch, retrofitting a jewelry flagship store, or hardening a distribution warehouse against organized theft, you’ll learn exactly how to plan zones, select and program the control panel, configure GSM notification logic, prioritize alarms, log events forensically, and implement remote arming/disarming — all while eliminating false alarms and ensuring 24/7 uptime.
By the end of this 8,000+ word deep-dive, you will have a complete, actionable blueprint you can hand to your installation team or use to evaluate supplier proposals with confidence. You’ll also understand why industrial-grade multi-zone GSM alarm panels outperform consumer-grade alternatives in scalability, tamper resistance, and integration potential. Let’s begin where every successful project starts: understanding the architecture that makes it all possible.

1. Fundamentals of Multi-Zone GSM Alarm Systems: Why They Outperform Legacy Designs
A GSM alarm system (also called a cellular intrusion alarm) transmits alarm signals over mobile networks instead of (or in addition to) traditional telephone lines. This eliminates single points of failure — no more cut phone cables, no more dependency on PSTN infrastructure that many carriers are phasing out.
The “multi-zone” element is what transforms a basic alarm into a professional security brain. Each zone represents an independent detection area that can be armed, bypassed, or responded to differently. A jewelry store might treat the display cases as Zone 1 (instant alarm), the stockroom as Zone 2 (delayed entry for staff), the roof access as Zone 3 (24-hour tamper), and panic buttons as Zone 4 (silent duress).
Professional GSM alarm panels support dozens to thousands of zones through wired, wireless, or addressable bus expansion. Modern industrial models use 32-bit ARM processors, RS-485 or similar bus architectures, and hybrid wired/wireless capabilities. They store thousands of event logs, support multiple user codes with hierarchical permissions, and deliver simultaneous SMS, voice calls, app push notifications, and IP reporting to central stations.
For high-risk facilities, the advantages are decisive:
- Instant remote notification — owners and responders receive alerts within seconds regardless of location.
- Redundant communication — dual-SIM 4G/5G modules plus fallback IP and even PSTN in hybrid setups.
- Scalability — start with 16–30 zones and expand to 1,600+ via addressable modules as the facility grows.
- Forensic-grade logging — timestamped records admissible in insurance claims and court.
- Remote control — arm, disarm, bypass zones, or check status via SMS or secure app from anywhere.
Industrial-grade panels also include built-in anti-jamming detection and multi-path transmission (cellular + IP + PSTN fallback), ensuring signals get through even during deliberate interference attempts common in organized crime targeting banks or jewelry stores. The result? Faster response times, dramatically reduced false alarms, and measurable ROI through lower insurance premiums and prevented losses. Now let’s dissect the heart of the system — the alarm control panel.
2. Alarm Control Panel Architecture: Building a Rock-Solid Foundation
The control panel is the command center. Choose incorrectly here and every downstream decision becomes compromised.
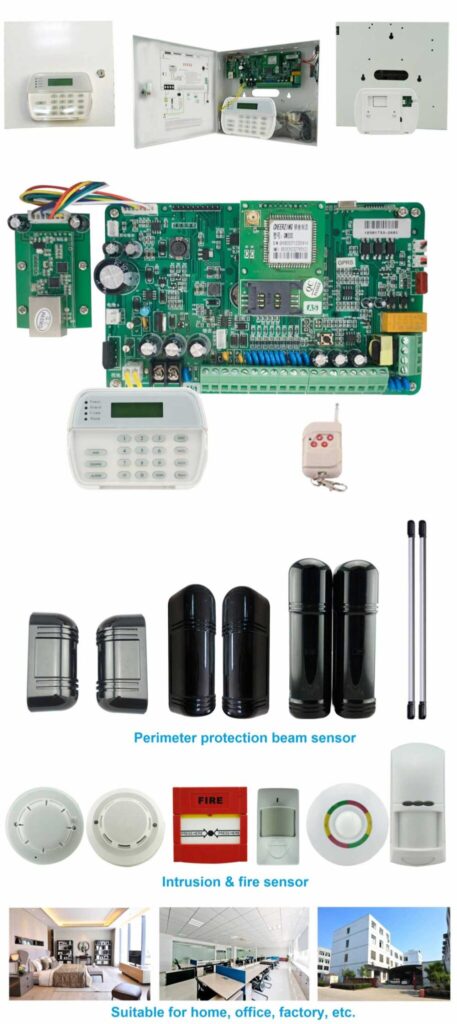
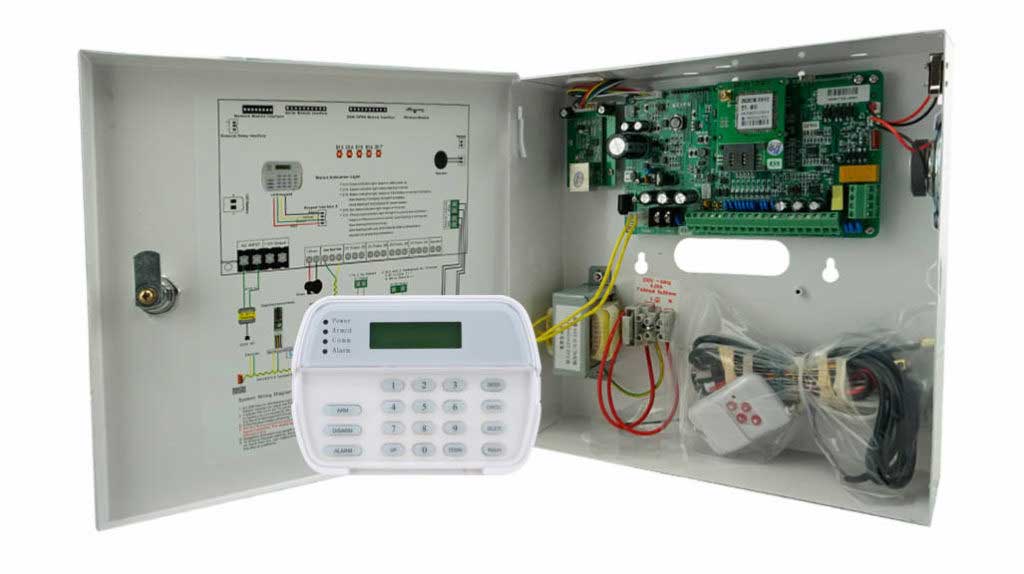
Industrial-grade panels for high-risk applications (think banks and warehouses) share these non-negotiable architectural features:
Core Processing
A 32-bit ARM microprocessor handles high-speed event processing, logic execution, and multi-tasking without lag. This is essential when 50+ sensors trigger simultaneously during a coordinated breach attempt.
Bus Architecture
RS-485 bus (or equivalent) allows addressable expansion modules to be daisy-chained over long distances with minimal wiring. One main panel can control 16 hardwired zones natively while supporting 30 wireless zones and expanding to 1,656 addressable zones via plug-in modules. This eliminates the spaghetti wiring nightmare of older zone-doubler panels and gives you precise sensor identification down to the exact device.
Power System
AC 220V primary with automatic switchover to sealed lead-acid backup batteries. Expect at least 24–72 hours of standby operation (calculate your exact requirement by adding up all sensor and output currents). Look for built-in short-circuit, overload, and surge protection (up to 4 kV) plus low-battery and AC-fail supervision that triggers its own GSM alert. Static consumption should stay under 150 mA for efficiency.
Tamper & Supervision
Panel enclosure tamper switch, battery fault monitoring, GSM signal strength supervision, and anti-jamming detection. In high-risk sites, add box-in-box mounting inside a steel security cabinet and consider triple end-of-line (TEOL) supervision for Grade 3 compliance to detect masking or cutting attempts.
Communication Module
Integrated or plug-in 4G/GSM module supporting LTE-FDD and GSM bands. Dual-SIM capability with automatic failover is mandatory. Advanced panels also offer TCP/IP Ethernet as primary with cellular backup, plus PSTN as a final fallback for absolute redundancy.
User Interface
LCD keypad with voice prompts (English + local language), support for 10–11 user codes with hierarchical permissions (super user, master, arm-only, etc.), and optional touchscreen or mobile app control.
Output Capabilities
Programmable relay outputs for sirens (internal/external), strobe lights, door locks, CCTV trigger, and dialer. Alarm output current typically 800 mA @ 12 V — sufficient for multiple high-power sirens.
Event Memory
Minimum 1,500-event non-volatile “black box” log that survives total power loss. Cloud synchronization for unlimited historical storage and remote audit.
When specifying, insist on panels certified to EN 50131 Grade 2 or higher (Grade 3 recommended for banks, jewelry stores, and high-value warehouses) and UL standards where applicable. These architectures have been battle-tested in financial institutions and logistics centers worldwide. Warning: Never skimp on power supervision — a low-battery fault that goes unnoticed is one of the most common reasons systems fail exactly when you need them most.
3. Zone Design Strategy: The Single Most Important Engineering Decision
Poor zone planning is the #1 reason professional systems underperform. Here is the exact methodology used by senior security engineers for high-risk facilities.
Step 1: Conduct a Threat & Vulnerability Assessment (2–4 hours onsite)
- Map every entry point: doors, windows, roof hatches, ventilation ducts, loading docks.
- Identify high-value assets and their locations (vaults, safes, display cases, server rooms).
- Review occupancy patterns: staff access times, cleaning schedules, delivery windows.
- Evaluate environmental factors: HVAC drafts, pets (rare in commercial but possible in warehouses), electromagnetic interference.
- Test GSM signal strength at panel location and sensor points (use a field strength meter or smartphone app). Document RSSI values — anything below -85 dBm needs an external antenna.
Step 2: Define Zone Types & Priorities
Professional panels support these standard zone types — assign them strategically:
- Instant (Perimeter): Door contacts, glass-break sensors. Triggers immediate alarm when system is armed.
- Delay (Interior): PIR motion detectors in corridors. Gives authorized users 30–60 seconds to disarm.
- 24-Hour: Panic buttons, tamper switches, seismic sensors on safes. Always active.
- Fire/Smoke: Separate zones for heat/smoke detectors (integrate with building fire system).
- Supervisory: Low battery, AC fail, tamper — non-alarm but logged and notified.
- Keyswitch/Arming: Zones used for arming stations.
For Grade 3 systems, add confirmed-alarm logic: two independent zones must trigger within a set time window before police notification is sent — this dramatically cuts false alarms while meeting insurance and police response requirements.
Step 3: Physical Zoning Strategy for Specific Facilities
Bank Branch Example
- Zone 1–4: Front & rear doors + ATMs (instant + glass-break)
- Zone 5–8: Customer area PIRs (delay)
- Zone 9: Vault room door + seismic (24-hour)
- Zone 10: Staff panic buttons (silent duress)
- Zone 11–12: Roof access & external perimeter beams
Jewelry Store Example
- Zones 1–6: Display cases (shock + magnetic contacts — instant)
- Zone 7: Stockroom motion (delay)
- Zone 8: Roof motion detector (24-hour)
- Zone 9: Hidden duress pedal under counter
- Zone 10: External roller shutter tamper
Warehouse Example
- Zones 1–8: Loading dock doors & roll-up shutters (instant)
- Zones 9–20: Internal motion in high-value storage aisles (delay)
- Zones 21–25: Perimeter fence beams + gate contacts
- Zone 26: Office panic + duress
Step 4: Sensor Placement & False-Alarm Mitigation
- PIRs: 2.1–2.4 m height, 90–110° coverage, avoid direct sunlight or heat vents. Use pet-immune or dual-tech (PIR + microwave) in challenging environments.
- Magnetic contacts: Mount on non-ferrous frames; use armored cable in exposed areas.
- Glass-break: Acoustic sensors on large panes; shock sensors on laminated glass.
- Addressable zones: Use one module per sensor for pinpoint location instead of grouping multiple sensors into one zone.
Pro Tip for False Alarms (the #1 complaint in high-risk sites): Implement cross-zone verification on interior areas — the panel only triggers a full alarm if two sensors activate within 30–60 seconds. This single programming choice has saved countless insurance claims and unnecessary police dispatches.
Step 5: Zone Grouping & Logic Programming
Most panels allow “area” or “partition” programming so different parts of the building can be armed independently (e.g., warehouse floor armed at night while office remains disarmed). Create up to 4 partitions with overlapping groups for maximum flexibility.
Document every zone in a spreadsheet with: zone number, type, sensor model, location, response type, and test procedure. This becomes your system manual and insurance requirement. Keep a laminated copy inside the panel enclosure.
4. Integrating and Managing Multiple Sensors: From Wiring to Wireless
Modern multi-zone GSM alarm systems shine in hybrid environments.
Wired Sensors
Use 4-core or 6-core alarm cable (0.5–1 mm²). End-of-line resistors (typically 2k2 or 4k7, or DEOL/TEOL for Grade 3) for supervision. Addressable modules convert traditional wired sensors to bus communication, reducing cable runs dramatically.
Wireless Sensors
433 MHz or 868 MHz encrypted two-way communication. Each sensor has unique ID; panel learns them during enrollment. Range up to 200 m line-of-sight with repeaters. Battery life 3–5 years with low-battery supervision and automatic jamming alerts sent to your phone.
Best Practice Workflow
- Install panel and GSM module first.
- Enroll all wireless devices (press learn button or scan QR).
- Wire hardwired zones with EOL resistors — double-check polarity and resistance with a multimeter before powering up.
- Walk-test every sensor in real environmental conditions (open doors, walk across PIRs at different speeds and angles).
- Program zone attributes (instant/delay/24-hr, chime, etc.).
- Set cross-zone verification if required (two sensors must trip within 30 seconds for alarm).
For facilities with 50+ sensors, addressable technology is mandatory — it tells the panel and the operator exactly which detector triggered, not just “Zone 7”. Warning: Never mix unencrypted wireless sensors in high-risk environments — intruders can clone signals in under 60 seconds with cheap tools.
5. Designing Alarm Priorities and Event Logging: Turning Data into Actionable Intelligence
Not every alarm deserves the same response. Professional panels let you define priority levels:
- Priority 1 (Critical): Silent duress, vault tamper, perimeter breach in armed state — immediate SMS + voice call to owner + police.
- Priority 2 (Urgent): Motion in high-value areas — SMS + app push + siren.
- Priority 3 (Supervisory): AC fail, low battery — daily summary email.
Event Logging Best Practices
- Store minimum 1,500 events locally (open/close, alarm, fault, user code used).
- Enable cloud upload for unlimited history and searchable audit trails.
- Log includes: date/time, zone/sensor ID, user ID, event type, GSM signal strength at time of event.
- Use the log for weekly security reviews and insurance compliance.
In one real-world jewelry store case, detailed event logs proved an insider had bypassed a zone nightly — evidence that led to swift resolution and full insurance payout. Download the log monthly via the app or USB and look for patterns: repeated faults on the same zone almost always signal wiring issues or sensor misalignment.
6. GSM Notification Logic: Ensuring Alerts Reach the Right People Instantly
This is where GSM systems deliver their biggest advantage.
Configuration Steps
- Insert two SIM cards from different carriers (one 4G data plan minimum).
- Program primary and backup phone numbers (up to 4 user numbers + 2 central station).
- Set event-to-notification mapping:
- Burglary zones → instant SMS + voice call + app push
- 24-hour zones → SMS + silent push
- System faults → daily summary
- Enable remote commands (customize these exact texts in the panel menu):
- SMS “ARM1” → arms area 1
- SMS “STATUS” → returns current arm state and open zones
- SMS “BYPASS 05” → temporarily bypasses zone 5
- SMS “LOG” → sends last 5 events
- Activate push notifications via dedicated app for faster delivery and GPS-stamped alerts.
- Set up voice reporting (pre-recorded messages: “Alarm Zone 3 — Jewelry Display”).
Redundancy Rules
- If primary SIM fails for 60 seconds, switch to secondary.
- If both cellular fail, fall back to IP reporting if available.
- Schedule weekly test SMS to confirm delivery.
Pro Tip: Always test in “real-world” conditions — stand outside the building and send test commands while the panel is armed. Many systems fail here because installers never verify signal strength under load.

7. Step-by-Step Implementation Guide: From Design to Go-Live
Phase 1: Procurement & Pre-Installation (Week 1)
Select panel, sensors, and GSM module based on zone count + 20% expansion margin. Order addressable modules if >30 zones. Verify all components are EN 50131 Grade 2/3 certified.
Phase 2: Physical Installation (Weeks 2–3)
- Mount panel in secure, ventilated location with backup battery.
- Run cabling or pair wireless devices.
- Install sensors per manufacturer templates.
- Connect sirens and outputs.
Phase 3: Programming & Configuration (Week 4)
- Enter installer code (usually 9999 or as per manual).
- Program system time, user codes, zone types, and partitions.
- Configure GSM module (APN settings for data, phone numbers, SMS text templates, event mapping).
- Set arming schedules if time-based auto-arm is required.
- Enable cross-zone, anti-jamming, and cloud logging.
Phase 4: Testing & Commissioning (Week 5)
- Walk-test every zone with panel in test mode.
- Simulate AC power failure, tamper events, GSM jamming (use a signal jammer tester).
- Verify SMS/call delivery to all contacts.
- Conduct full-system drill with staff.
- Generate and review first event log report.
Phase 5: Handover & Training
Provide documented zone map, user manual, and 30-minute training session. Schedule first quarterly maintenance visit.
Ongoing Maintenance
- Monthly: check logs and test one random zone.
- Quarterly: battery load test (measure voltage under load), sensor cleaning, GSM signal audit.
- Annually: full system audit, firmware update, and recalibration of all PIRs and beams.
Common Pitfall: Forgetting to budget for spare batteries and repeaters — plan for 10–15% extra sensors upfront to avoid expensive call-outs later.
8. Advanced Features & Integration for Maximum Protection
Top-tier multi-zone GSM alarm systems integrate seamlessly with:
- CCTV (trigger recording + snapshot via relay for instant visual verification).
- Access control (door forced open triggers alarm).
- Building management systems.
- Central monitoring stations (Contact ID or SIA protocol for professional response).
Emerging capabilities include AI false-alarm filtering (analyzes video before notifying police) and 5G-ready modules for sub-second response. For jewelry stores and banks, add seismic sensors on safes and roller-shutter contacts — these 24-hour zones have stopped more smash-and-grab attempts than any other single measure.
Conclusion: Turn Knowledge into Unbreakable Security
You now possess the complete engineering blueprint for designing a multi-zone GSM alarm system that professional installers and facility owners trust in the most demanding environments. The difference between a basic alarm and a system that actually stops determined intruders lies in meticulous zone planning, industrial-grade architecture, intelligent GSM logic, and rigorous testing — exactly what this guide has delivered.
Ready to specify or upgrade your facility’s protection? Industrial-grade GSM alarm panels with true multi-zone expansion, dual-SIM 4G communication, forensic logging, and EN 50131 Grade 3 readiness are available today for projects of any scale. Contact our technical team with your site layout and zone count — we’ll provide a tailored bill of materials and design review within 24 hours. Protect what matters most. Your assets — and your peace of mind — deserve nothing less.