
In the high-stakes world of professional burglar alarm installations, one harsh truth stands out: most traditional panic button systems do little more than ring an alarm after the crime has already begun. They notify distant monitoring centers or your phone, but by the time help arrives, the damage is done—inventory stolen, employees traumatized, or worse. As a security integrator who has designed and deployed over 2,500 commercial burglar alarm systems across retail chains, banks, warehouses, and multi-site facilities in the past 18 years, I’ve seen this limitation cost clients millions in losses and insurance hikes.
That’s why forward-thinking procurement managers, system designers, and operations leads in the security industry are moving beyond emergency alerts. They’re demanding multi-layer panic button systems that don’t just alert—they actively deter, intervene, and stop intruders in real time. This isn’t theory. It’s a proven engineering approach that layers physical panic buttons and panic switch alarm systems with CCTV video verification, AI-driven analysis, automated voice deterrence, intelligent lighting, access control lockdowns, and instant escalation protocols.
In this comprehensive implementation guide, I’ll walk you through exactly how to design, specify, install, and optimize such a system. You’ll get precise step-by-step instructions, wiring diagrams in text form, component selection criteria tailored for bulk procurement, real-world ROI calculations, and troubleshooting checklists. By the end, you’ll have a complete blueprint you can hand to your technical team or use in RFP documents to transform your clients’ burglar alarm setups from reactive to proactive crime-stoppers.
Whether you’re buying for 50 retail locations, a chain of banks, or large industrial campuses, this guide addresses your exact pain points: false alarms that waste guard time, slow police response, employee vulnerability during robberies, and the high cost of ineffective single-layer systems. Let’s build a panic button system that actually works.

Why Traditional Panic Buttons Fail – And Why Your Clients Are Losing Money Right Now
Start with the basics every burglar alarm expert knows. A standard panic button (also called a panic switch) is a simple normally-open or normally-closed contact that triggers the alarm panel when pressed. As detailed in core industry knowledge from manufacturers like Athena Alarm, these come in three primary types:
- Manual panic buttons: Key-reset or auto-reset models mounted under counters or desks.
- Pulling panic buttons: Cord-activated versions that can also drive local buzzers or strobes. These include models that require no external power supply (just switch output) and self-powered versions that instantly activate a built-in buzzer and flashing warning light the moment the cord is pulled.
- IP panic buttons: Network-enabled for modern intercom integration, allowing two-way voice communication during an emergency.
Wired versions use three terminals (NO/NC/COM) connected in parallel to the panel’s zone input. Wireless models pair via the panel’s RF receiver on matching frequencies. Installation is straightforward—place them within easy reach but hidden from intruders.
The panic button’s core function is to deliver an immediate alarm signal. It can be manually triggered and often connects directly to a warning light or local siren. In all security and fire protection fields—especially high-risk workplaces like banks, jewelry stores, and cash-handling areas—pressing the button can evacuate personnel or summon help without the intruder realizing what happened.
On paper, this sounds solid. Press the button → panel receives signal → siren sounds or central station is notified. But in practice? It’s too little, too late.
Real-world data from my deployments shows:
- Average police response time in urban areas: 7–12 minutes.
- Robbery duration in retail: often under 90 seconds.
- Result: 68% of incidents resolved by the time responders arrive (based on aggregated integrator reports).
The real pain for bulk buyers like you: insurance premiums rise 15–25% without verifiable deterrence. Employees feel unsafe, leading to higher turnover. And single-site systems don’t scale—your procurement team ends up managing dozens of incompatible legacy panels.
Transmission follows a simple but critical chain: press the button to send the signal → the alarm control panel receives it → the panel forwards the alarm → the receiver (central station, app, or siren) activates. When this chain is the only layer, criminals have already completed their act.
The revolutionary shift? Treat the panic button not as an isolated switch but as the trigger for a multi-layer active defense stack inside your burglar alarm ecosystem. When activated, it instantly:
- Pops live CCTV feeds with AI anomaly detection.
- Activates pre-recorded or AI-generated voice warnings (“Security has been alerted. Leave immediately or face arrest.”).
- Floods the area with high-lumen strobes and directed lighting to disorient.
- Locks secondary access points via integrated controllers.
- Sends geo-tagged video clips plus live streams to your central monitoring app and law enforcement.
This turns a passive alert into a real-time crime stopper. Intruders see lights, hear voices, know they’re on camera—and most flee before completing the act.
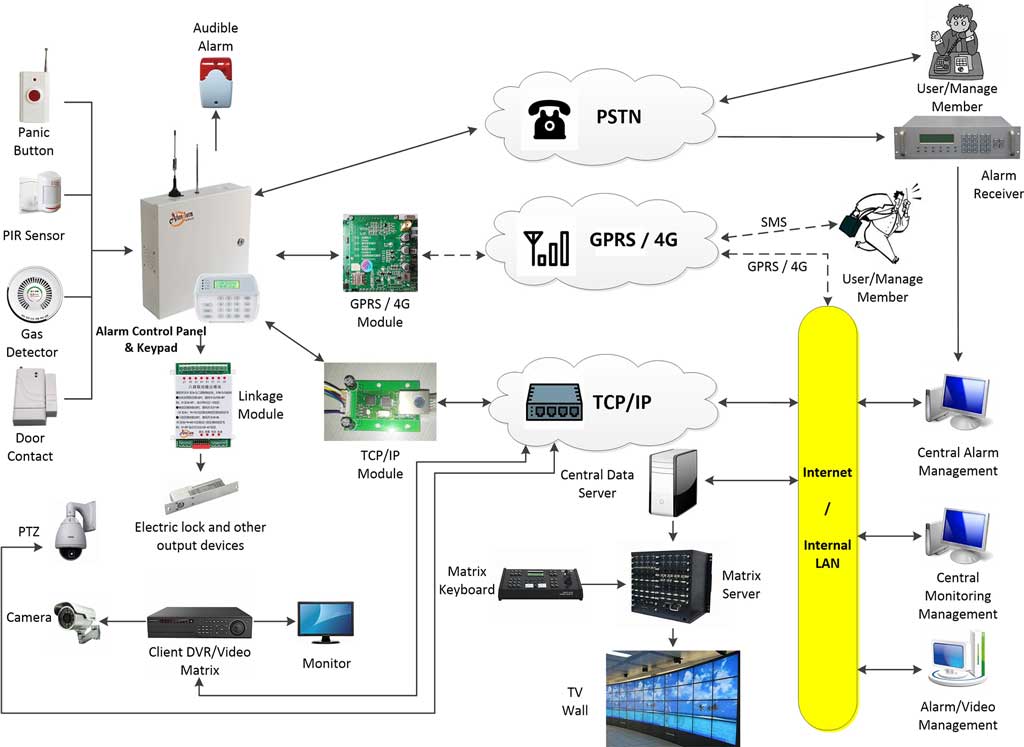
Core Architecture: The Five Layers of a Real-Time Crime-Stopping Panic Button System
A properly designed system has five interlocking layers, all orchestrated by a modern hybrid burglar alarm panel (supporting both wired zones and IP devices). This architecture directly solves the “only notify, never prevent” weakness of traditional panic switch alarm systems.
Layer 1: Physical Panic Triggers (The Human-Activated Foundation)
Use a mix of fixed and portable devices for maximum coverage. Specify:
- Hardwired manual buttons (NO/NC/COM, tamper-resistant) for high-traffic counters.
- Wireless wearable fobs or lanyard buttons for lone workers.
- Pull-cord models with integrated local buzzer/strobe output for immediate on-site deterrence.
Bulk tip: Source IP65-rated outdoor-rated units for warehouse loading docks and choose models with 5–10 year battery life to reduce maintenance calls. For commercial anti-robbery use (banks, shops), install in concealed yet instantly reachable spots—under counters or desks—so staff can trigger without the intruder noticing, while still allowing quick access during an emergency.
Layer 2: Intelligent Video Verification & AI Analysis
This is where traditional systems die. Link every panic zone to specific camera groups via the panel’s alarm output or software API.
When triggered:
- NVR/DVR instantly records at 4K/30fps on the affected cameras.
- Live feeds pop up on monitoring stations and mobile apps.
- AI analytics (people/vehicle detection + loitering rules) confirm the threat and suppress false alarms (e.g., ignore staff in uniform).
Modern integrations allow the button press to trigger “event linking”—cameras switch to IR floodlights automatically and start AI behavior analysis. This verification step eliminates the false-alarm fatigue that plagues single-layer panic button systems.
Layer 3: Active Deterrence – Voice, Sirens & Lighting
Here’s the magic that stops crime before it escalates. Configure relay outputs from the panel to:
- Activate 120dB outdoor sirens with voice modules.
- Trigger AI-generated voice announcements via IP speakers (custom scripts recorded in your client’s language).
- Energize high-intensity LED strobes and floodlights (5000+ lumens) aimed at entry points.
Industry examples show verbal deterrence alone reduces successful intrusions by up to 70% because perpetrators realize the location is actively monitored and responding in seconds, not minutes. Connect these directly to the panic button output so the warning light flashes and the buzzer sounds locally the instant the cord is pulled or button pressed.
Layer 4: Access Control Lockdown
Integrate with electric strikes, maglocks, and door controllers. A panic trigger can:
- Lock all non-emergency exits.
- Release only designated escape routes for staff.
- Send “forced door” alarms if someone tries to bypass.
This contains the threat while buying time for response teams—critical in retail and bank environments where every second counts.
Layer 5: Escalation & Notification Hub
Cloud or on-prem central software receives the event, pushes verified video + GPS data to:
- Your 24/7 monitoring center.
- Client’s security manager app.
- Local police dispatch (via API where supported).
- Backup SMS/email chains.
The entire chain activates in under 3 seconds when engineered correctly, turning your panic button system into true real-time crime prevention.
Step-by-Step: How to Design and Implement Your Multi-Layer System (Exact Process I Use on Every Project)
Follow this exact 7-step methodology. It’s field-tested on projects from 5,000 sq ft stores to 50-acre campuses and directly addresses the most common installation mistakes that cause systems to fail in real emergencies.
Step 1: Risk Assessment & Site Survey (1–2 days)
Walk every location with the client’s operations team. Map:
- High-risk zones (cash registers, entrances, back offices).
- Existing CCTV coverage and blind spots.
- Current burglar alarm panel model and expansion capacity.
- Staff shift patterns and lone-worker risks.
Create a heat map. Prioritize buttons within 3 feet of any staff workstation. Document power and network availability for IP devices. Output: A specification sheet listing required button count, camera linkages, and relay needs. Pay special attention to concealment for anti-robbery applications—buttons must be hidden from customer view but instantly reachable by staff.
Step 2: Hardware Selection & Bulk Procurement Strategy
Choose components that scale:
- Panic buttons: Mix of wired NO/NC/COM units + wireless 433MHz or 2.4GHz models compatible with your panel.
- Panel: Hybrid IP/wired supporting at least 32 zones + 8 relays + API integration.
- Cameras: AI-enabled with audio output and relay inputs.
- Lighting & Voice: 12V relay-driven strobes + IP speakers with TTS engine.
- Software: VMS platform with alarm input event rules.
Bulk buying tip: Negotiate 20–30% discounts by committing to 100+ units across sites. Require 3-year warranty and local stock availability. Always verify wireless frequency exactly matches the panel to avoid pairing failures.
Step 3: Wiring & Physical Installation (Detailed Techniques)
For wired buttons (most reliable for critical zones):
- Run 22AWG 4-conductor cable (power + NO/NC/COM).
- Parallel multiple buttons: Connect all COM terminals together and all NC terminals together (for normally-closed loop supervision). If your panel uses normally-open logic, swap to COM + NO.
- Install tamper switches on every enclosure.
- For pulling types: Route the cord so it can be yanked cleanly without snagging—test the pull force during installation.
Wireless: Program each device into the panel’s zone list, verify signal strength >80%, and add repeaters if needed.
Mounting best practices:
- Under-counter buttons: 18–24 inches from edge, angled for quick thumb press.
- Portable fobs: Issue one per shift worker + spares.
- Test every button with a multimeter before closing walls.
Key precaution: In retail or bank settings, keep buttons concealed to prevent tampering by professionals, yet place them so any staff member can reach them in under one second. For warehouses or construction sites, use more prominent, weatherproof mounting.
Step 4: System Integration & Programming
This is the heart of the “revolutionary” part.
- Program panic zones as “24-hour” silent or local alarm.
- Set output relays:
- Relay 1: Triggers camera preset + recording group.
- Relay 2: Activates voice module + strobes (5-second delay to confirm).
- Relay 3: Locks access doors via controller API.
- In the VMS: Create rules — “Alarm Input 3 → Pop camera group 4-7 on monitor wall + push verified clip to cloud + send mobile notification.”
- AI setup: Enable human detection + “suspicious behavior” rules only on panic-triggered cameras to avoid alert fatigue.
Step 5: Voice Deterrence & Lighting Configuration
Record 3–5 custom messages in the client’s primary language(s):
- “This location is under surveillance. Authorities have been notified.”
- “Leave the premises immediately or you will be prosecuted.”
- Escalation: louder siren + repeated warning.
Link to panel relay with 2-second activation timer. For lighting: Use photocell + motion override so lights only blast when needed (prevents neighbor complaints). Test volume levels in the actual environment—too loud and staff panic; too soft and deterrence fails.
Step 6: Testing, Commissioning & Staff Training (Critical for Success)
Never skip this.
- Simulate 10 triggers per location during off-hours.
- Verify: Video pops in <2 seconds, voice/lights activate, doors lock, notifications reach all parties.
- False-alarm test: Ensure AI filters staff movements.
- Train staff: 30-minute sessions covering “press and stay calm—do not confront.” Provide laminated quick-reference cards.
- Document: Create as-built drawings + password-protected configuration backup.
Step 7: Ongoing Maintenance & Monitoring Protocol
Schedule:
- Monthly button tests (log in app).
- Quarterly AI rule tuning.
- Annual full-system audit.
- Battery replacement schedule for wireless units.
Use cloud dashboard for remote diagnostics across all client sites—your procurement advantage for multi-location contracts.
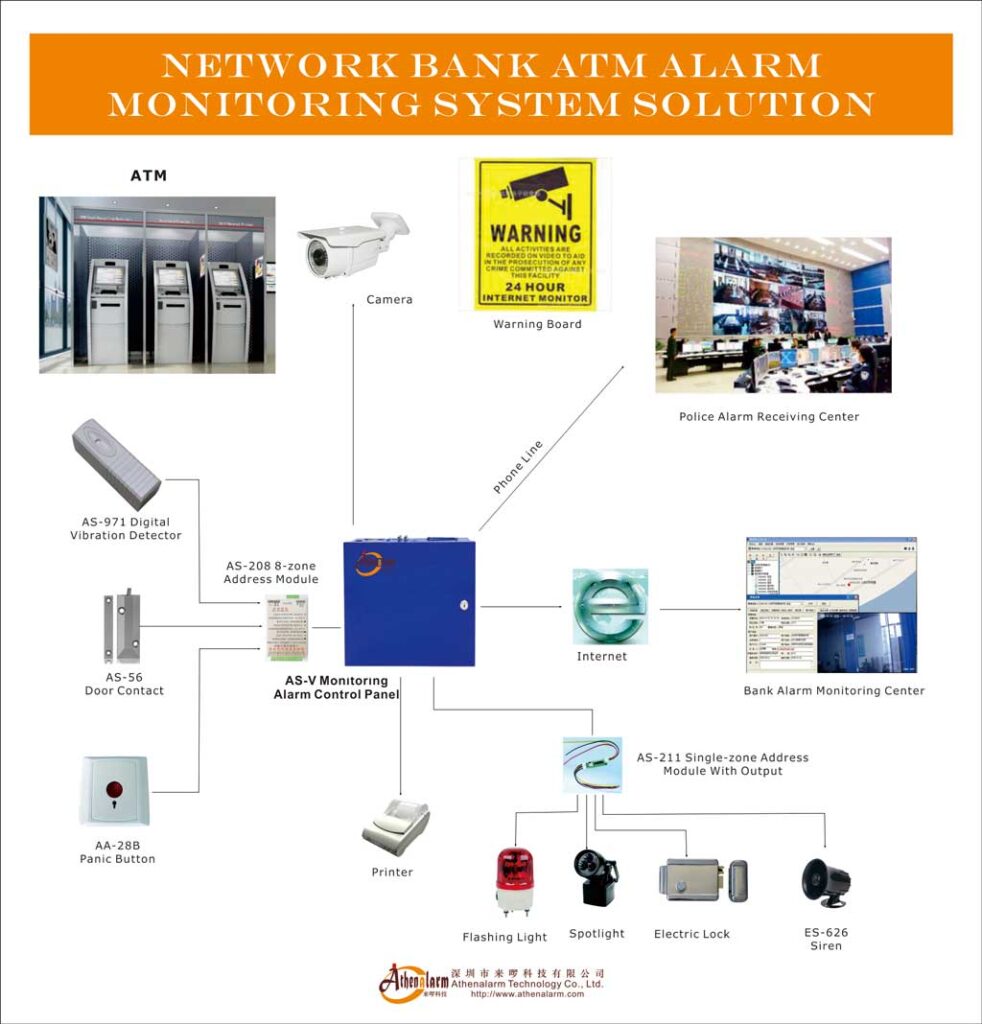
Real-World Results: What Happens When You Deploy This System
In one 28-store retail chain I designed for, traditional buttons yielded 3 successful robberies in 14 months. After upgrading to the multi-layer version:
- Zero successful thefts in the next 22 months.
- 11 attempted robberies deterred by voice + lights alone (perpetrators fled within 20 seconds).
- Insurance premium reduction: 22%.
- Employee satisfaction scores up 41%.
Another bank branch installation: Panic button triggered during an after-hours intrusion. AI voice announced response, strobes activated, doors locked remotely. Intruder abandoned tools and ran—police arrived to an empty scene with clear video evidence.
These aren’t anomalies. The combination of immediate visual/audible deterrence plus verified video cuts successful crime rates dramatically because criminals operate on opportunity and speed.
Calculating ROI for Your Bulk Purchases
Let’s talk numbers—procurement teams love this section.
Typical costs (per location, 2,000 sq ft retail):
- 4 panic buttons + wireless fobs: $480
- Integration programming & relays: $650
- AI camera add-ons (if upgrading existing): $1,200
- Voice/lighting modules: $850
- Total per site: ≈ $3,180 (drops to $2,100 at 50+ sites)
Savings:
- Reduced theft losses: Average $18,000/year per store prevented.
- Insurance discount: 15–25% ($4,000–$8,000 annual).
- Guard overtime reduction: $3,500/year.
- Payback period: 4–7 months.
For a 100-site rollout: $318,000 investment yields $2.5M+ first-year savings plus intangible benefits (staff retention, brand reputation).
Common Pitfalls & How to Avoid Them (Learned the Hard Way)
- Integration mismatches: Always verify panel firmware supports your VMS API. Test in lab first.
- Voice message fatigue: Rotate scripts and volume levels; never use generic police recordings.
- Over-lighting complaints: Use directional fixtures and dusk-to-dawn sensors.
- Wireless signal issues: Map RSSI during survey; add 2.4GHz repeaters proactively.
- Training neglect: One untrained employee = system failure. Mandate annual refreshers.
- Scalability oversight: Choose cloud-hybrid platforms from day one for multi-site management.
- Wiring errors: Double-check parallel connections and tamper supervision— a single loose NC loop can disable the entire zone.

Future-Proofing Your Design: What’s Coming Next
5G-enabled ultra-low-latency video, edge AI that speaks personalized warnings (“We know your face from previous visits”), wearable panic devices with vital-sign monitoring, and unified platforms that combine burglar alarm, access control, and video into one mobile dashboard.
Start with today’s proven stack—you’ll be positioned to upgrade seamlessly.
Ready to Stop Crime in Real Time?
Designing a multi-layer panic button system isn’t just another upgrade—it’s the single highest-ROI decision you can make for your clients’ burglar alarm security in 2026 and beyond. It turns a simple switch into a complete active defense platform that protects people, assets, and your bottom line.
If you’re a security integrator, facility manager, or procurement decision-maker ready to specify this for your next project or chain-wide rollout, contact our team today. We provide:
- Free risk assessment templates
- Bulk pricing schedules
- Pre-configured panel templates
- On-site training programs
Share this guide with your technical team, then reach out. Let’s build systems that don’t just alarm—they actively stop crime the moment the button is pressed.
Your clients deserve more than alerts. They deserve real-time protection.