
In the high-stakes world of banking, where every second counts and threats lurk around every corner, a one-size-fits-all approach to security simply won’t cut it. As a seasoned expert in the intrusion detection and alarm systems industry with over two decades of hands-on experience designing, installing, and optimizing bank alarm systems for major financial institutions across North America and Europe, I’ve seen firsthand how inadequate protection can lead to devastating breaches. But here’s the good news: by adopting a layered banking security model tailored specifically to the unique vulnerabilities of each banking zone, you can create a fortress-like defense that not only deters intruders but also ensures rapid response and minimal downtime.
This comprehensive guide dives deep into designing a robust security alarm system for banks, focusing on the bank alarm system as the core backbone of your defense strategy. We’ll break down the Layered Banking Security Model – a proven framework I’ve refined through countless real-world implementations – and provide step-by-step instructions on how to apply it across critical areas like vaults, cash handling zones, ATMs, lobbies, night entrances, offices, and IT rooms. Whether you’re a bank security director, system integrator, or procurement specialist sourcing alarm components in bulk, this article equips you with actionable insights to safeguard assets, protect staff, and comply with stringent regulations like those from the FDIC or PCI DSS. Let’s transform your bank’s vulnerabilities into impenetrable strengths.
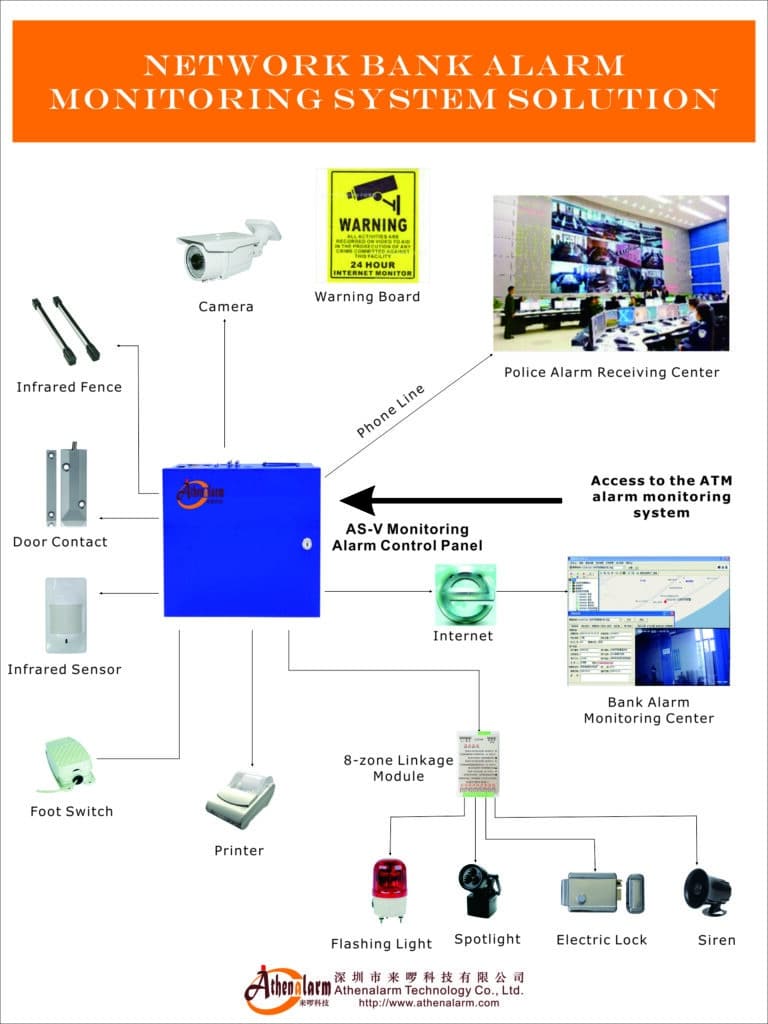
Understanding the Layered Banking Security Model: A Blueprint for Comprehensive Protection
Traditional bank alarm systems often treat the entire facility as a monolithic entity, triggering alerts based on generic motion detection or door contacts. This oversight is a critical flaw – banks aren’t uniform spaces; they’re a mosaic of zones with varying risk profiles, access patterns, and asset values. The Layered Banking Security Model addresses this by segmenting the bank into concentric layers of defense, much like a medieval castle with moats, walls, and inner keeps. Each layer incorporates specialized detectors, intelligent arming logic, and integration with central monitoring to create overlapping protections that adapt to operational hours.
At its core, this model emphasizes:
- Perimeter Defense: Outer layers focus on early detection to prevent breaches.
- Zonal Segmentation: Inner layers provide escalating responses based on threat severity.
- Adaptive Modes: Systems switch between armed (non-business hours) and disarmed/stay modes (business hours) with user-defined rules.
- Integration and Redundancy: Linking alarms to CCTV, access control, and duress signals ensures no single point of failure.
- Scalability: Designed for easy expansion, accommodating everything from small branches to large headquarters.
Drawing from my experience consulting on over 150 bank security projects, this model reduces false alarms by up to 40% while improving response times by integrating AI-driven analytics for anomaly detection. To further enhance reliability, incorporate power backups like uninterruptible power supplies (UPS) and generators to maintain operation during outages, which are common exploit points for intruders. Additionally, consider wireless versus wired systems: wired offers robustness against jamming, but wireless provides flexibility for retrofits – always test signal integrity in high-interference environments like urban branches.
Before we dive into zone-specific designs, let’s outline the foundational steps to implement this model, including key considerations for regulatory compliance and cost management.
Step-by-Step Implementation of the Layered Banking Security Model
- Conduct a Site Assessment: Begin with a thorough walkthrough of the bank. Map out all zones, identify entry points, high-value assets, and traffic patterns. Use tools like floor plans and risk assessment software (e.g., from vendors like Honeywell or Bosch) to quantify threats – for instance, calculate the probability of smash-and-grab at ATMs versus insider threats in offices. Involve stakeholders such as branch managers and IT staff to uncover hidden vulnerabilities, like outdated wiring that could cause system failures. Document findings in a report, prioritizing risks based on asset value and historical incident data from sources like FBI crime reports.
- Select Core Components: Choose a central control panel compliant with UL 1610 standards for bank alarm systems. Opt for modular systems like those from DSC or Paradox that support wireless and wired hybrids for flexibility. Evaluate integration capabilities with existing infrastructure, such as IP-based communication for faster alerts. Factor in scalability by selecting panels with expandable zones (up to 128 or more) to accommodate future growth.
- Define Arming Logic: Program modes using the panel’s software. For example, set “Full Arm” for after-hours, activating all perimeter and interior sensors; “Stay Arm” for business hours, focusing on high-risk zones while allowing lobby movement. Customize logic to include time-based schedules, user permissions, and exception rules for maintenance windows. A common pitfall is overlooking user error – train on intuitive interfaces to avoid accidental disarms.
- Integrate with Monitoring: Connect to a central station monitoring service (CSMS) certified under UL 827. Ensure 24/7 oversight with redundant communication paths (cellular, IP, and landline). Add SMS/email notifications for key personnel and integrate with mobile apps for remote arming/verification. Test failover scenarios to confirm seamless switching during network disruptions.
- Test and Train: Simulate breaches in each zone, verify alerts, and train staff on panic buttons and duress codes. Document everything for compliance audits. Conduct drills quarterly, including scenarios like power loss or multiple simultaneous alarms, to identify weak points. Use post-drill debriefs to refine procedures and reduce response times.
- Ongoing Maintenance: Schedule quarterly inspections, firmware updates, and battery replacements to maintain 99.9% uptime. Establish a maintenance log to track issues, and partner with certified technicians for annual certifications. Budget for this – ongoing costs can range from $5,000 to $15,000 per year per branch, depending on system complexity.
With this foundation, let’s explore how to apply the model to each critical banking zone, starting from the most secure inward and working outward. For quick reference, here’s a summary table of recommended detectors by zone:
| Zone | Primary Detectors | Key Risks Addressed | Arming Priority |
|---|---|---|---|
| Vault | Seismic, Glassbreak, Door Contacts, IR Motion, Environmental | Drilling, Explosives, Tampering | High (24/7) |
| Cash Handling | Panic Buttons, Money Clips, Beam Detectors, CCTV-Linked Motion | Robberies, Internal Theft | Medium-High |
| ATM | Tilt/Shock, Skimmer, Gas Attack, Video-Integrated | Smash-and-Grab, Skimming, Explosives | High |
| Lobby | Wide-Area Motion, Door Chimes, Glassbreak | Distraction Robberies, Break-Ins | Medium |
| Night Entrances | Outdoor PIRs, Buried Cables | After-Hours Exploitation | High (Night) |
| Offices | Keypad Zones, Asset Tags | Insider Threats, Document Theft | Medium |
| IT Rooms | Environmental Monitors, Fiber Optic | Cyber-Physical Attacks, Overheating | High (24/7) |
This table helps visualize overlaps and ensures comprehensive coverage.

Securing the Vault: The Heart of Your Bank’s Assets
The vault isn’t just a room; it’s the sanctum sanctorum where millions in cash and valuables reside. In my career, I’ve designed vault alarm systems that withstood sophisticated attacks, including those using thermal lances or insider collusion. Here, the focus is on multi-sensor detection to catch tampering early. A key challenge is balancing sensitivity to avoid false alarms from environmental factors like earthquakes in seismic-prone areas – always calibrate based on local conditions.
Suitable Alarm Detectors for the Vault
- Seismic Sensors: Mount these on walls and floors to detect vibrations from drilling or explosives. Models like the Honeywell 5800SS1 offer sensitivity adjustments to ignore minor tremors. Install at least two per surface for redundancy.
- Glassbreak Detectors: For vaults with viewing windows, use acoustic sensors (e.g., Bosch DS110) that differentiate between breaking glass and ambient noise. Position them within 25 feet of glass surfaces for optimal coverage.
- Door Contacts and Magnetic Switches: Heavy-duty versions rated for high-security doors, such as Sentrol’s 2700 series, to alert on unauthorized openings. Use tamper-proof enclosures to prevent sabotage.
- Infrared Motion Detectors: Dual-tech PIR/microwave units (e.g., Optex RX-40) for interior coverage, reducing false alarms in stable environments. Avoid placement near HVAC vents to minimize air current triggers.
- Environmental Sensors: Integrate flood, temperature, and humidity detectors to prevent non-intrusion damages like water leaks. For example, set thresholds at 10% humidity deviation or 2-inch water levels.
Additional detectors to consider: Heat detectors for fire risks and oxygen level monitors in airtight vaults to alert on suffocation hazards during breaches.
Arming Logic for the Vault
The vault should remain in a perpetual “high-security” state. Use time-delayed entry/exit paths with keypads requiring dual authentication (PIN + biometric). In armed mode, any detection triggers an immediate silent alarm to law enforcement, bypassing audible sirens to avoid alerting intruders prematurely. During business hours, arm only the inner vault while allowing supervised access to outer safes. Integrate with access logs to flag unusual patterns, like repeated failed entries.
Business vs. Non-Business Hours Modes
- Business Hours: Partial arming – motion detectors off during scheduled access, but seismic and contacts always active. Require logged entry via access control integration. Monitor for “tailgating” by linking to door sensors.
- Non-Business Hours: Full arming with auto-alerts to CSMS. Add duress codes for coerced openings, such as reversing the last two digits of a PIN.
For ATM anti-robbery integration (detailed later), link vault alarms to panic systems for holistic response. Step-by-step vault setup: 1) Map vault layout and mount sensors securely. 2) Wire to the control panel with shielded cables to prevent EMI interference. 3) Program zones in the software, testing each sensor individually. 4) Simulate attacks like drilling to fine-tune sensitivity. 5) Document configurations for audits.
In one project for a regional bank chain, implementing this setup prevented a $2 million loss during an attempted breach – the seismic sensors caught the drill before it penetrated. Easy error to avoid: Regularly check battery backups, as dead batteries account for 20% of vault alarm failures.
Protecting the Cash Handling Zone: Where Money Moves
Cash handling areas, including teller drawers and counting rooms, are hotspots for internal theft and armed robberies. These zones demand discreet yet responsive alarms to protect staff without escalating situations. Insider threats are particularly tricky – use audit trails to track access and deter misconduct.
Suitable Alarm Detectors
- Hold-Up Buttons (Panic Buttons): Foot-activated or under-counter models (e.g., DMP’s 1144) for silent alerts during robberies. Ensure they are ergonomically placed for quick activation without drawing attention.
- Money Clip Sensors: Thin sensors in cash drawers that detect removal of bait money, triggering alerts. Pair with serialized bait bills for post-incident tracking.
- Beam Detectors: Photoelectric beams (e.g., Takex PB-100F) across doorways to detect unauthorized entry without motion false alarms. Align beams at knee and chest height for comprehensive coverage.
- CCTV-Linked Motion Sensors: Integrate with video analytics to verify alerts visually. Use AI to distinguish between staff and intruders based on behavior patterns.
Add ultrasonic detectors for enclosed counting rooms to detect subtle movements in low-visibility areas.
Arming Logic
Employ zone bypassing for authorized personnel via RFID badges. Alerts escalate: first to on-site security, then to police if unacknowledged within 30 seconds. Include geo-location tagging if using wireless devices.
Modes
- Business Hours: Stay mode – panic buttons active, motion off in active areas. Allow for temporary disarms during cash transfers.
- Non-Business Hours: Full arm with auto-locking doors and immediate audible alerts for deterrence.
Step-by-step for installing panic buttons: 1) Identify high-risk spots like teller stations and map reachability. 2) Wire buttons to the control panel using tamper-resistant cabling, routing through conduits to avoid exposure. 3) Program for silent transmission to CSMS, including location data. 4) Test with simulated hold-ups, ensuring response within 60 seconds and verifying no accidental triggers from daily use. 5) Train staff on usage, emphasizing discretion to prevent panic escalation.
A frequent mistake is inadequate training – ensure role-playing includes de-escalation alongside alarm activation.

Fortifying ATM Areas: Defending Against Smash-and-Grab and Skimming
ATMs are prime targets for quick hits, with FBI data showing over 2,000 incidents annually in the U.S. alone. Designing ATM anti-robbery alarms requires blending physical deterrence with rapid notification. Emerging threats like “jackpotting” (malware attacks) necessitate hybrid physical-digital protections.
ATM-Specific Alarm Design
- Tilt and Shock Sensors: Detect ramming or jacking attempts (e.g., Honeywell’s SC100). Calibrate to ignore vehicle vibrations in drive-thru setups.
- Card Skimmer Detectors: Magnetic field sensors to alert on overlay devices. Integrate with periodic self-checks to scan for anomalies.
- Gas Attack Sensors: For ATMs vulnerable to explosive gases, use specialized detectors from vendors like Risco. Place near vents to catch early infiltration.
- Video-Integrated Alarms: Link to AI cameras that detect loitering or tampering. Use facial recognition for repeat offender alerts, complying with privacy laws.
Incorporate ink staining devices in cash cassettes as a last-resort deterrent.
Arming Logic
Use geofencing to arm ATMs outside business hours. Triggers send alerts with video feeds to responders. Set up tiered responses: minor shocks notify maintenance, severe ones alert police.
ATM Robbery Prevention Steps
- Assess ATM location – vestibule vs. drive-thru, noting environmental factors like lighting.
- Install sensors: Mount shock detectors on the chassis and test for stability.
- Integrate with bank alarm system for unified monitoring, ensuring compatibility with ATM software.
- Add dye packs or GPS trackers in cassettes for recovery.
- Train staff on emergency protocols, including safe evacuation routes.
- Conduct vulnerability scans quarterly, simulating common attacks like ramming with vehicles.
In non-business hours, enable audible sirens to deter; during hours, focus on silent panic. Watch for over-sensitivity in shock sensors, which can trigger from nearby construction – adjust thresholds accordingly.
Safeguarding the Lobby: Balancing Accessibility and Security
Bank lobbies are public-facing, making them susceptible to distractions during robberies. The goal is subtle surveillance without alienating customers. High foot traffic demands robust false alarm reduction strategies.
Detectors
- Wide-Area Motion Sensors: Ceiling-mounted PIRs (e.g., Bosch ISC-PPR1) with pet immunity for after-hours. Use adjustable lenses for customized coverage patterns.
- Door Chime Contacts: For entry alerts during hours, providing auditory cues without full alarms.
- Glassbreak Arrays: Covering large windows, with multi-frequency detection for various glass types.
Add pressure mats under rugs for discreet entry detection in high-traffic spots.
Logic and Modes
Business: Disarmed but with panic integration and loitering alerts. Non-business: Armed with entry delays of 15-30 seconds for authorized access.
Implementation: 1) Zone the lobby separately in the control panel. 2) Program for customer flow, bypassing during peak hours. 3) Link to intercoms for verification of suspicious activity. 4) Test during actual business to ensure no disruptions. A common error is ignoring seasonal changes – recalibrate for increased traffic during holidays.

Securing Night Entrances: The Weak Link After Dark
Night entrances, including deposit boxes, are often exploited post-hours. These areas require weather-resistant solutions to withstand elements.
Detectors
- Outdoor PIRs: Weatherproof models (e.g., Optex BX-80N) for perimeter, with long-range detection up to 80 feet.
- Buried Cable Sensors: For ground detection around entrances, sensing pressure or vibrations.
Incorporate infrared barriers for added layers.
Logic
Always armed post-hours; integrate with lighting for deterrence and CCTV for evidence. Set delays for night deposit users.
Steps: 1) Bury cables 6-12 inches deep along perimeters, avoiding utility lines. 2) Calibrate sensitivity to ignore wildlife. 3) Test with simulated approaches, adjusting for soil types. 4) Integrate with timers for automatic arming at closing. Avoid installation in flood-prone areas without proper sealing.
Office Areas: Protecting Against Insider Threats
Offices house sensitive documents; focus on access control to mitigate risks from employees or visitors.
Detectors
- Keypad Zones: For room-specific arming, with individual codes for accountability.
- Asset Tags: RFID for equipment tracking, alerting on removal from zones.
Add window contacts for overlooked entry points.
Modes: Partial arm during hours for unoccupied offices, with motion active in storage areas. Step-by-step: 1) Assign zones per office group. 2) Program access levels. 3) Monitor logs for anomalies like after-hours access. Insider threats often stem from lax policies – enforce regular password changes.
IT Rooms: Guarding the Digital Backbone
IT rooms face cyber-physical threats, where a physical breach can enable data hacks.
Detectors
- Environmental Monitors: For overheating or unauthorized access, with alerts at 80°F thresholds.
- Fiber Optic Sensors: For cable tampering, detecting bends or cuts.
Include smoke detectors integrated with suppression systems.
Logic: 24/7 arming with biometric entry and two-person rule for high-security.
Steps for setup: 1) Install door contacts and motion at entries. 2) Integrate with network monitoring for correlated alerts (e.g., unusual login post-physical breach). 3) Ensure failover power with dual UPS units. 4) Test integrations monthly. A pitfall is insufficient cooling – monitor HVAC ties to prevent false environmental alarms.
Panic Button System Design: Empowering Staff in Crisis
A well-designed panic button system is the human element in your bank alarm system, bridging technology and personnel.
Design Steps
- Placement: Under desks, on keychains, or wearable – ensure reachability without visibility. Survey staff for optimal spots.
- Types: Wired for reliability in fixed positions, wireless for mobility (e.g., Honeywell’s 5802WXT) with range up to 200 feet.
- Integration: Link to GPS for location, CCTV for verification, and access control to lock down areas.
- Programming: Set for silent alerts with duress codes (e.g., entering PIN backward triggers help). Include confirmation tones for user feedback.
- Testing: Monthly drills, logging responses and adjusting based on feedback.
- Maintenance: Battery checks every six months, signal strength audits, and replacements as needed.
In one installation, this system averted a robbery by alerting police before demands were made. Emphasize psychological training to reduce hesitation in crises.
Business vs. Non-Business Hours: Adaptive Strategies for Peak Protection
Switching modes is crucial for operational efficiency:
- Business Hours: Focus on duress and high-risk zones; minimize false alarms from customer movement by using intelligent analytics to filter normal activity.
- Non-Business Hours: Full perimeter and interior activation; auto-notify on any breach with escalated protocols for weekends/holidays.
- Transition Protocols: Use schedules or apps for arming; override for maintenance with supervisory approval. Automate via time clocks, but include manual overrides for flexibility.
A table for mode comparisons:
| Mode | Active Zones | Alert Type | Key Features |
|---|---|---|---|
| Business Hours | High-risk (e.g., Vault, ATM) | Silent/Duress Primarily | Customer-Friendly, Low Disruption |
| Non-Business | All Zones | Immediate/Audible | Maximum Deterrence |
| Transition | Variable | Notification to Staff | Scheduled Arm/Disarm |
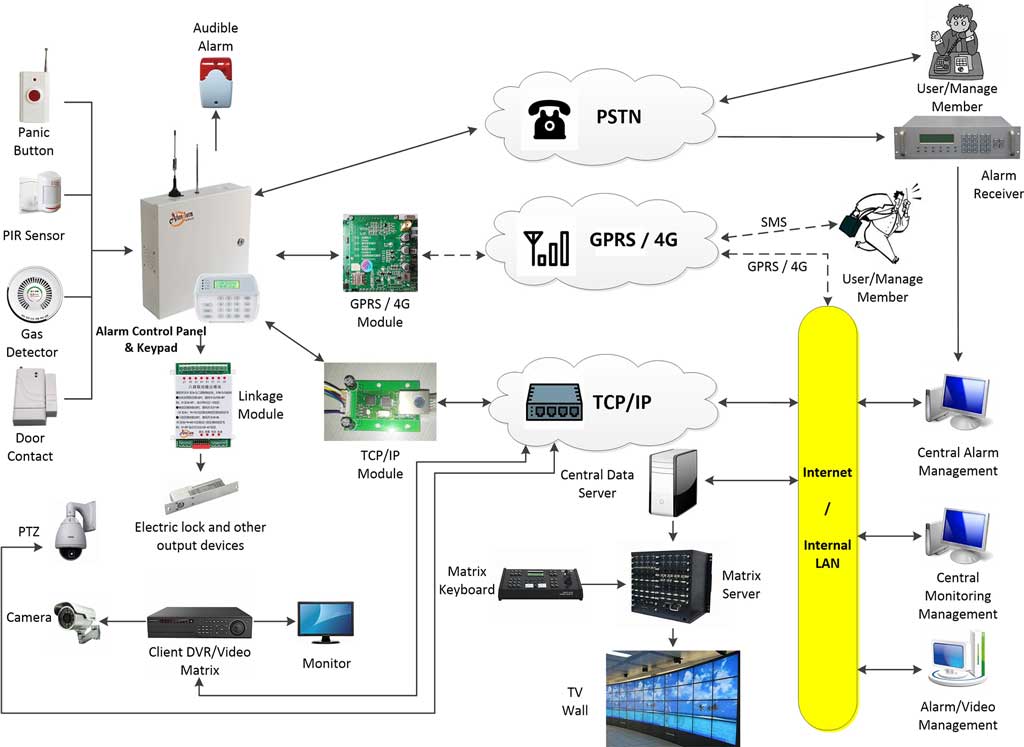
Integrating Advanced Technologies: Enhancing the Layered Model
To future-proof your system, integrate IoT devices for real-time data and AI for predictive analytics. For example, use machine learning to analyze patterns and preempt threats. Ensure cybersecurity by encrypting communications and complying with standards like NIST. Cost-wise, initial integration adds 10-20% to budgets but reduces long-term incidents.
Overcoming Common Challenges in Bank Alarm System Deployment
Address false alarms with AI tuning and multi-sensor verification – aim for under 5% false rate through proper calibration. Ensure compliance with audits by maintaining detailed logs and certifications. Budget for scalability – expect $50,000-$200,000 per branch depending on size, with ROI from reduced losses. Other hurdles: Vendor compatibility – standardize on open protocols like ONVIF. Staff resistance – overcome with inclusive training. Regulatory updates – stay abreast of changes in FDIC guidelines via annual reviews.
Conclusion: Elevate Your Bank’s Defenses Today
Implementing this layered bank alarm system isn’t just about compliance; it’s about peace of mind and unbreakable security. As someone who’s dedicated their career to fortifying financial institutions, I urge you: don’t wait for a breach. Contact our team for a free consultation on customizing this model for your needs – let’s build the security alarm system for banks that sets the industry standard. With these strategies, you’ll not only protect assets but also foster a safer environment for everyone involved.