

Introduction
Rising burglary incidents continue to challenge commercial facilities, small businesses, and high-value storage sites. According to recent FBI Uniform Crime Reporting data, properties without intrusion alarm protection are significantly more likely to experience successful break-ins. For security professionals, product managers, and procurement specialists, installing a burglar alarm system correctly is essential for minimizing risk, meeting compliance expectations, and ensuring long-term operational reliability.
This guide provides a technical, field-tested framework for installing burglar alarm systems in professional environments. It consolidates best practices from UL intrusion detection standards, NFPA 731 requirements, EN 50131 classifications, and widely adopted procedures used by experienced integrators. Whether you’re a technician handling on-site deployment or a procurement decision-maker evaluating large-scale installations, this burglar alarm installation guide offers the clarity and depth needed for informed decisions.
Throughout the article, you will find practical steps, troubleshooting insights, and component-selection guidelines tailored to real-world project demands.
1. Understanding Burglar Alarm System Components
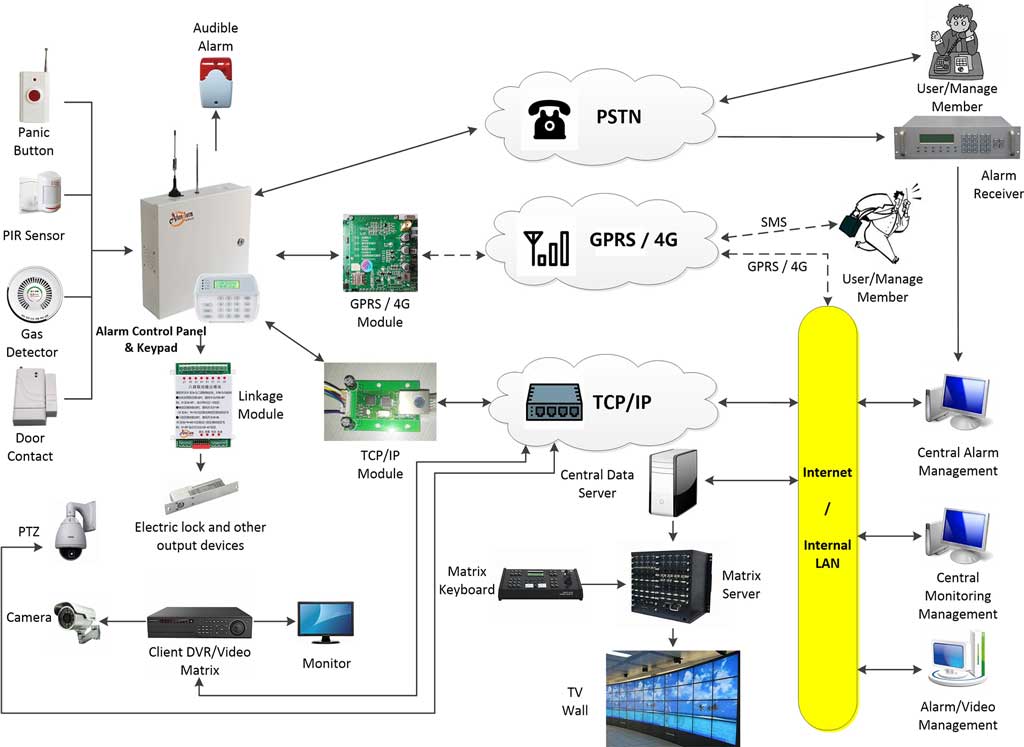
Before beginning the installation, security professionals must have a complete understanding of the system’s architecture. A standard intrusion alarm solution includes:
Key Components
- Control Panel (FACP/Intrusion Panel) – The system’s core, responsible for processing signals.
- Sensors
- Door/window magnetic contacts
- PIR motion detectors
- Glass-break sensors
- Vibration/shock sensors
- Sirens and Audible Alerts – Indoor and outdoor options with tamper protection.
- Keypads or Touch Consoles – Used for arming, disarming, and configuration.
- Communication Modules – IP, PSTN, GSM, LTE, or integrated cloud modules.
- Monitoring Integration – Connections to ARC/CMS (Alarm Receiving Centers).
System Types
- Wired systems – Stable, suitable for large commercial sites.
- Wireless systems – Flexible, require frequency compliance (FCC/CE).
- Hybrid systems – Scalable for projects with mixed infrastructure.
Professionals must select components based on site assessments to avoid over-specification, compatibility issues, and procurement waste. Systems compliant with EN 50131 Grade 2 or Grade 3 ensure higher tamper resistance for commercial installations—an important factor in bulk purchasing.
2. Pre-Installation Planning and Site Assessment
A successful installation starts long before the first sensor is mounted.
Conducting a Security Risk Assessment
- Identify all vulnerable entry points.
- Map zones: perimeter, interior movement, restricted areas.
- Review environmental factors—humidity, heat, vibration, airflow.
- Evaluate the need for fail-safe power (batteries, UPS).
Security professionals should align assessments with ASIS International Physical Security Principles, which emphasize layered protection and zone-based detection.
Procurement & Compliance Considerations
For product managers or procurement officers:
- Confirm certifications: UL 639, FCC Part 15 (wireless), CE, EN 50131.
- Assess supplier reliability and warranty terms.
- When ordering in bulk, consider uniform model selection to simplify maintenance.
Common Pitfalls
- Poor placement of PIR sensors near HVAC vents.
- Insufficient wire gauge for long-distance cable runs.
- Overlooking cellular backup modules for communication redundancy.
3. Essential Tools and Materials for Installation
Professionals should prepare the required equipment before deploying onsite.
Technical Tools
- Multimeter / continuity tester
- Drill with masonry & wood bits
- Cable tester
- Wire stripper / crimping tool
- Screwdrivers & hex drivers
- Labeling machine for cable identification
Materials
- High-grade alarm cables (22/4, 18/2, or as specified)
- Mounting screws and anchors
- Backup batteries (12V sealed lead-acid or LiFePO4)
- Tamper switches for control panels and enclosures
- Adhesive pads for wireless sensors
- Conduits or trunking systems for cable protection
Following OSHA safety guidelines for tool usage reduces installation-related injury risks.
4. Step-by-Step Installation Process
Below is a practical, field-tested sequence widely used in commercial intrusion deployments.
Step 1 — Mount the Control Panel
- Select a secure, hidden, ventilated location.
- Ensure proximity to power sources and network points.
- Install tamper switches inside the enclosure.
Step 2 — Install and Wire Sensors
For Wired Systems
- Route cables through protected paths.
- Maintain consistent cable labeling to simplify diagnostics.
- Use EOL (End-of-Line) resistors when required by panel specifications.
For Wireless Systems
- Test signal strength before mounting.
- Avoid metal obstacles that may cause RF attenuation.
- Pair devices following manufacturer instructions (e.g., DSC, Honeywell, Texecom).
Step 3 — Install Keypads and Sirens
- Keypads: place near primary entry/exit points.
- Sirens: mount high and out of reach, with tamper protection.
Step 4 — Program Zones and System Logic
- Define each zone type (perimeter, interior, delay, 24-hour).
- Configure entry/exit delays according to operational needs.
- Enable communication paths: IP first, then cellular backup.
Step 5 — Integrate With Monitoring Services
- Configure ARC/CMS IDs, formats (SIA, CID), and heartbeat intervals.
- Test connectivity to ensure alarm signals reach the receiving center.
Step 6 — Troubleshooting Common Issues
- Sensor not enrolling: Check battery orientation or RF interference.
- Wired loop faults: Verify EOL resistor placement.
- False alarms: Review PIR placement and environmental conditions.
5. Testing, Troubleshooting, and Maintenance
Functional Testing
- Simulate door/window intrusions.
- Test motion detector walk-throughs.
- Verify alarm sound output and keypad messages.
- Confirm that all event logs reach the monitoring center.
System Optimization & Maintenance
- Replace backup batteries every 24–36 months.
- Conduct quarterly inspection of wiring integrity.
- Update firmware for cloud-connected systems.
- Review zone activity logs to detect anomalies.
For large-scale buyers, standardized maintenance practices improve ROI and reduce operational downtime. Research from the Electronic Security Association (ESA) shows a strong correlation between regular maintenance and reduced false alarm rates.
Conclusion
Mastering burglar alarm system installation is essential for modern security professionals and decision-makers responsible for securing assets, optimizing procurement, and ensuring regulatory compliance. By following structured planning steps, understanding system components, and applying industry-aligned installation techniques, organizations achieve higher reliability, fewer faults, and better long-term performance.
This guide empowers technicians, product managers, and procurement specialists with practical knowledge that improves deployment outcomes and supports informed purchasing decisions. As intrusion technology advances—with AI-based analytics, cloud monitoring, and hybrid communication paths—professionals who continuously refine their installation practices will maintain a clear security advantage.
References
- FBI Uniform Crime Reporting (UCR) Program – Burglary Statistics
- UL 639 – Standard for Intrusion-Detection Units
- UL 294 – Standard for Access Control System Units
- NFPA 731 – Standard for the Installation of Electronic Premises Security Systems
- EN 50131 – Intrusion and Hold-Up Alarm Systems Standard
- ASIS International – Physical Security Principles
- Electronic Security Association (ESA) – Industry Research Reports
- Security Industry Association (SIA) – Best Practices for Intrusion Detection Systems