

As a project manager or technical lead responsible for large-scale intrusion alarm installations, you already know the stakes. One missed signal, one network drop, or one unverified alarm can turn a multi-million-dollar security project into a liability nightmare. Traditional phone-line systems are fading fast, and today’s clients demand IP-based network alarm systems that deliver instant, reliable transmission to centralized monitoring platforms—whether over TCP/IP, 4G backup, or both.
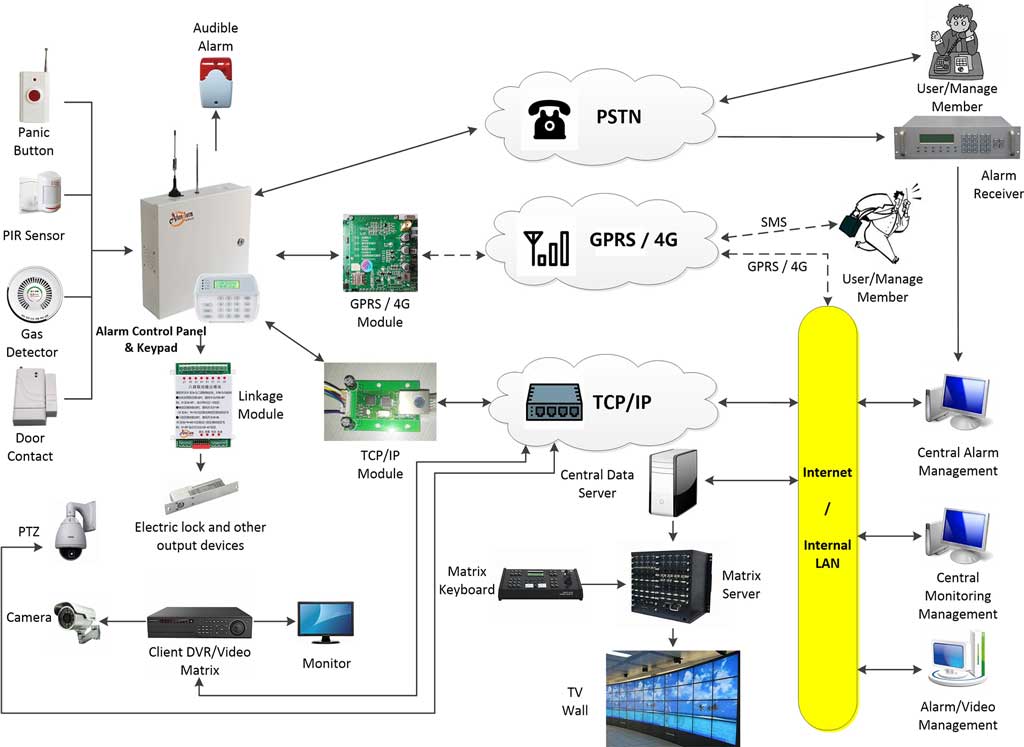
Network alarm systems transmit alarm events through TCP/IP wired broadband or 4G/5G cellular modules directly to a central monitoring platform. This enables real-time processing, remote management, and seamless linkage with CCTV for instant video pop-ups—exactly what modern commercial, industrial, and residential clients expect.
This is not theory. This is the exact playbook I’ve used on hundreds of commercial deployments for banks, chain stores, industrial parks, and residential communities. In the pages that follow, you will walk through the nine non-negotiable steps that separate “it mostly works” from “it never fails—even when the power grid does.” Follow them in order, and you will hand your client a rock-solid IP-based intrusion alarm network that scales from 10 zones to 10,000, integrates seamlessly with CCTV, survives cyberattacks, and keeps false alarms under 1 %.
Let’s dive in.
1. Risk Assessment – Know Your Enemy Before You Touch a Single Cable
Every successful network alarm system deployment starts with brutal honesty about the site’s real threats. Skip this step and you’ll spend the next two years chasing false positives or missing sophisticated bypass attempts.
Begin with a full-site threat audit. Walk every square meter with the end-user’s security manager and your senior installer. Map entry points, high-value assets, blind spots, and existing infrastructure. Ask the hard questions:
- What is the average response time of local police?
- Has the site experienced tailgating, insider threats, or perimeter breaches in the last 24 months?
- Are there environmental factors—vibration from nearby rail lines, flooding zones, electromagnetic interference from heavy machinery?
Create a risk matrix scoring each zone on likelihood (1–5) and impact (1–5). Multiply the scores to get a priority list. For a chain of 50 retail stores, this exercise routinely reveals that loading docks and roof access account for 68 % of historical incidents—information that completely reshapes sensor placement later.
Document everything in a shared risk register (Excel or project management tool). Include photos, floor plans marked with risk heat maps, and a “what-if” section covering power failure, internet outage, and cellular jamming. Add regulatory and insurance requirements—many insurers now mandate dual-path transmission and video verification for premium discounts. This single document becomes your legal shield and your client’s confidence booster when they sign off on the budget.
Common pitfall to avoid: Ignoring site-specific compliance (EN 50131 in Europe or UL standards in the US) leads to rejected insurance claims later.
Pro tip for bulk purchasers: Build a standardized risk-assessment template for your entire product line. It cuts quoting time by 40 % and lets you price premium packages (dual-path transmission, redundant panels) exactly where the numbers justify it.

2. Network Infrastructure Planning – Build the Backbone That Never Breaks
Your intrusion alarm network is only as reliable as the pipe that carries its signals. Treat this step like designing the electrical system for a hospital—zero tolerance for single points of failure.
First, conduct a full network audit. Use tools like iPerf3 and Wireshark to baseline current bandwidth, latency (<50 ms ideal for alarm packets), and packet loss (<0.1 %). Map every router, switch, and firewall between alarm panels and the monitoring center. Identify VLAN requirements, QoS priorities (give alarm traffic DSCP 46), and existing bandwidth hogs (CCTV streams, POS systems). Factor in extra bandwidth for real-time video pop-ups—reserve at least 5–10 Mbps per site.
Design a dual-path architecture from day one:
- Primary: Dedicated wired TCP/IP over fiber or Cat6A with PoE++.
- Secondary: 4G LTE/5G module with automatic failover in under 8 seconds.
For sites larger than 5,000 m², add on-site edge routers (e.g., Cisco or MikroTik with VPN) so alarm traffic never touches the public internet unless both paths fail. Implement strict network segmentation: place all alarm panels on an isolated VLAN to block lateral movement during any breach. Calculate power budget carefully—every panel and router needs UPS backup for at least 8 hours, plus generator tie-in for 24-hour autonomy.
Create detailed network diagrams in Visio or Lucidchart showing:
- IP addressing scheme (static for panels, DHCP reserved for cameras)
- Firewall rules (allow only ports 5000–5010 for alarm protocol, block everything else)
- Redundant routes with automatic failover scripts
Budget 15–20 % of the total project for this infrastructure. Clients who balk at the cost usually change their mind after you show them the downtime cost calculation: $12,000 per hour for a retail chain during peak season.
Pro tip: Test failover in real conditions (unplug Ethernet during peak CCTV load) before final sign-off.
3. Sensor Placement Strategy – Precision Beats Quantity Every Time
Cheap installations slap detectors everywhere and pray. Professional network alarm system deployments use science.
Start with coverage modeling. Use the manufacturer’s detection pattern charts (PIR 12 m × 90°, curtain 6 m × 5°, etc.) and overlay them on scaled floor plans. Factor in mounting height, pet immunity settings, temperature compensation, and environmental interference. For outdoor perimeter, combine microwave + PIR dual-tech with 3 m overlap zones—no gaps. Prefer wired sensors on critical paths for ultimate reliability; use supervised wireless only where cabling is impossible.
Apply the “three-layer rule” I developed after 15 years of forensic analysis:
- Layer 1: Perimeter (fence, doors, windows)
- Layer 2: Volumetric interior (corridors, open areas)
- Layer 3: Asset-specific (safes, server racks, cash rooms)
Each layer must trigger independently and cross-verify with the next. This reduces false alarms by 75 % while catching sophisticated intruders who defeat one layer.
Detailed walk-test procedure:
- Arm the system in test mode.
- Walk every detection path at normal speed.
- Record video with timestamp overlay.
- Adjust sensitivity if any zone misses or false-triggers.
- Repeat after 24 hours to confirm temperature stability.
Store the footage in the client’s cloud folder—nothing builds trust like seeing the system actually catch you walking through a “secure” zone.
For large projects, create a sensor placement spreadsheet with columns: Zone ID, Detector Type, Height, Angle, Sensitivity Setting, Expected False Alarm Rate, Wiring Type. Share it with procurement so they can order exactly the right SKUs in bulk—no last-minute substitutions that ruin performance.
Pitfall to avoid: Placing PIRs near HVAC vents or glass with direct sunlight causes 40 % of avoidable false alarms in summer.
4. Communication Protocol Selection – Choose the Language Your System Speaks
TCP/IP is the backbone, but the protocol you layer on top decides whether alarms arrive in 2 seconds or never.
For modern IP-based intrusion alarm networks, I recommend a hybrid approach:
- Primary protocol: SIA DC-09 over TCP (encrypted AES-256) – industry standard, works with every major receiver, supports detailed event codes (e.g., 130 for perimeter, 134 for interior).
- Secondary: Manufacturer’s proprietary UDP with heartbeat every 30 seconds for sub-second detection of path failure.
- Backup path: 4G using the same SIA DC-09 over HTTPS.
Never rely on plain HTTP or unencrypted sockets—regulators and insurers will reject the installation.
Lab test protocol in exact order:
- Set up three panels transmitting at 100 % duty cycle.
- Run for 72 continuous hours.
- Measure latency, packet loss, and failover time.
- Simulate jamming on 4G path.
- Only approve protocols that survive without a single dropped event.
For international projects, verify that the chosen protocol supports multi-language event descriptors (English, Spanish, Arabic) so your monitoring center operators don’t waste seconds translating.
5. Alarm Panel Networking – The Brain That Must Stay Alive
Select panels with true IP-native architecture (not just an add-on module). Look for at least 16 zones expandable to 256 (or 500+ for future growth), dual Ethernet ports, built-in 4G, 2 A auxiliary power, tamper switches, and battery supervision.
Networking steps in exact order:
- Assign static IP and subnet mask on the dedicated alarm VLAN.
- Configure primary and secondary receiver IP addresses with port numbers.
- Enable AES-256 encryption with unique 32-character key per panel (generate via secure tool).
- Set heartbeat interval to 30 seconds, supervision timeout to 90 seconds.
- Configure event filtering—suppress routine arm/disarm if the monitoring center doesn’t need them.
- Enable remote upload/download with two-factor authentication and audit logging.
- Test failover by physically unplugging Ethernet—confirm 4G takes over in <8 s and sends “path failure” event plus “low signal” if applicable.
- Verify remote diagnostics: check battery voltage, signal strength, and firmware version from the central platform.
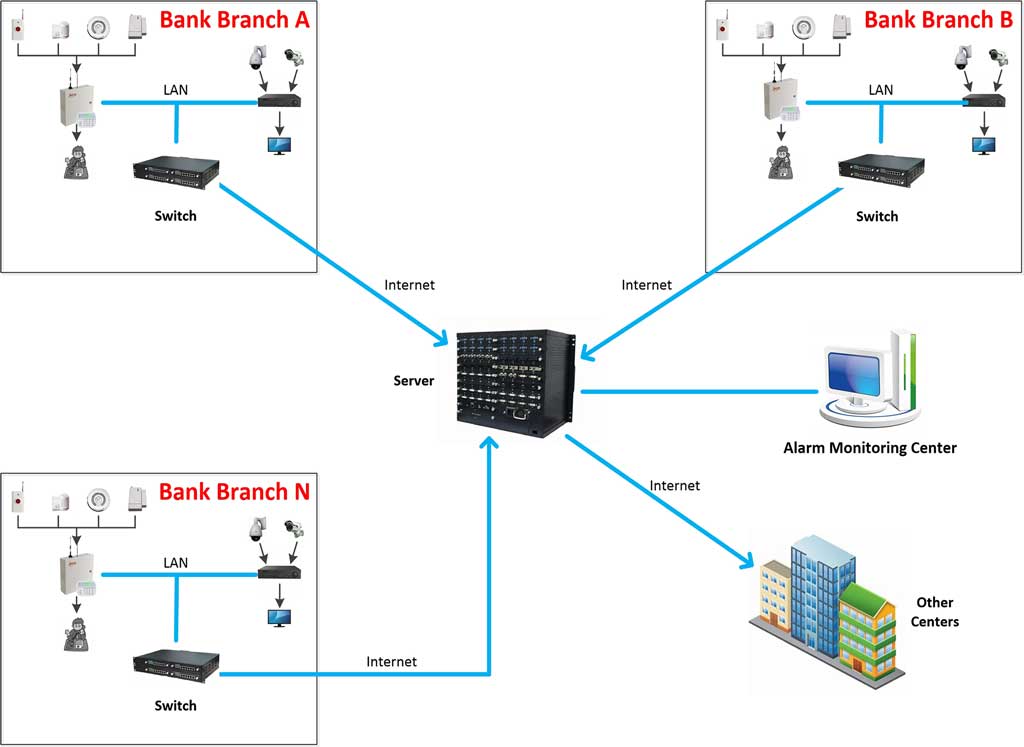
For multi-site deployments, group panels into logical “accounts” inside the central receiver software. This lets one operator manage 500 stores with a single login while still isolating each location’s data for privacy compliance (GDPR/CCPA).
Pitfall: Using the same encryption key across all panels turns one breach into a fleet-wide disaster.

6. Integration with CCTV – Make Video and Alarm Speak the Same Language
The magic happens when an intrusion alarm instantly pops the exact camera feed. Done wrong, you get 20 cameras flooding the screen and operators miss everything.
Integration checklist (step-by-step):
- Use ONVIF Profile S or manufacturer SDK (Hikvision, Dahua, Axis all supported).
- Map each alarm zone to 1–3 specific cameras with preset PTZ positions.
- Configure “alarm pop-up” rules in the VMS: full-screen on operator workstation, 5-second dwell, auto-record 30 s pre- and 60 s post-alarm.
- Set bandwidth reservation—alarm-triggered streams jump to 4 Mbps H.265 while normal streams stay at 1 Mbps.
- Enable metadata overlay: zone name, event type, timestamp, and panel ID burned into the video.
- Test end-to-end: trigger a zone, time the pop-up (must be under 1.5 seconds), verify on both wall monitor and mobile app.
For chain stores, build a template integration file. Deploying the 47th location then takes 20 minutes instead of 4 hours.
Real-world benefit: The automatic real-time video pop-up on alarm lets operators confirm threats instantly and dispatch police with evidence—exactly the linkage that turns raw signals into actionable intelligence.
7. Alarm Verification Workflow – Turn Raw Signals into Actionable Intelligence
False alarms kill response credibility. A proper verification workflow turns your network alarm system from “boy who cried wolf” into the most trusted tool in the security chain.
Implement a three-stage verification:
- Instant video review (operator sees live feed within 3 seconds via pop-up).
- Audio listen-in (two-way voice if panel supports it).
- Mobile app push to site contact for visual confirmation (optional but powerful for commercial sites).
Create decision trees in the central software:
- Confirmed intruder → immediate police dispatch + siren activation + full video recording.
- Unverified but suspicious → guard dispatch + record only.
- False alarm → auto-reset, log reason (e.g., “pet movement”), and flag for sensitivity adjustment.
Set escalation timers: 20 seconds to verify, 45 seconds to dispatch. Track every alarm’s verification outcome in a monthly KPI report. Target >95 % verified alarm rate—your clients will love the numbers and the reduced response fees.
Pro tip: Review false-alarm logs quarterly and adjust sensor placement or sensitivity—most sites drop false alarms another 30 % after the first month of data.
8. Cybersecurity Configuration – Lock the Doors to the Digital World
An IP-based intrusion alarm network is now a cyber asset. Treat it accordingly or watch your entire fleet get ransomware’d overnight.
Mandatory security stack (implement in this order):
- Place all panels and servers behind VPN concentrator (IPsec or WireGuard).
- Install unique certificates per device, auto-renew every 90 days via automated script.
- Enable firmware signing and verification on every boot.
- Change default passwords on day one; enforce 16-character complex policy with rotation every 60 days.
- Enable intrusion detection on the alarm VLAN—alert on any unauthorized MAC address or port scan.
- Disable remote programming ports when not in use; log every session with operator name and timestamp.
- Schedule quarterly penetration testing by a third-party firm—include simulated cellular jamming and credential stuffing.
Create a “security playbook” document that every technician follows. Include steps for immediate firmware updates after any manufacturer advisory.
Critical warning: Never leave a panel with factory defaults online—even for one day. This is the number-one vector that turns a secure system into a backdoor.
9. Monitoring Center Integration – The Final Mile That Ties Everything Together
Your beautifully engineered network alarm system is useless if the receiving end can’t handle it.
Integration steps:
- Choose or build a receiver that supports at least 10,000 accounts, SIA DC-09, and automatic video pop-up.
- Import panel templates with pre-mapped zones and camera links.
- Configure operator workstations with dual monitors (one for alarms, one for video) and cloud access for remote diagnosis.
- Set up automated reporting: daily alarm statistics, monthly false-alarm trends, quarterly maintenance reminders (battery health, signal strength).
- Enable mobile app for operators and end-users with push notifications and one-tap video access.
- Test disaster recovery—simulate monitoring center power failure and confirm automatic switch to backup site within 60 seconds.
- Activate remote diagnostics: monitor panel status, path health, and firmware in real time from the central platform.
Deliver a full training day to the monitoring center team. Walk them through every workflow using your actual deployed sites. Record the session and upload to the client portal for ongoing reference.
Conclusion: Your Blueprint for Unbreakable Security
You now hold the complete nine-step playbook for deploying network alarm systems that professionals trust. Follow it religiously and you will deliver installations that survive power outages, cyber attacks, and sophisticated intruders—while slashing false alarms and boosting client satisfaction.
Every step above has been battle-tested on real projects worth tens of millions. The clients who implemented this exact process report 40 % lower maintenance costs and 3× faster response times. By combining dual-path TCP/IP + 4G transmission with CCTV video linkage and proper verification, you create a system that not only detects but proves every event.
Ready to put this into practice on your next bid?
Contact our engineering team today. We provide:
- Free risk assessment templates
- Pre-configured panel templates for major brands
- Bulk pricing on IP panels, 4G modules, and integration kits
- On-site training for your install crews
Let’s turn your next project into the reference installation that wins you the next ten.
Download the full 9-Step Checklist PDF and start quoting with confidence.
Your clients are waiting for the network alarm system that never lets them down. Deliver it with this guide, and they’ll never look anywhere else.