
In the high-stakes world of property security, one failure can cost everything. Property owners, facility managers, and security installers know the nightmare all too well: a WiFi alarm system that goes dark the moment the router hiccups, a storm knocks out the broadband, or signal interference creeps in from neighboring networks. For residential homes in rural fringes, vacation properties with spotty coverage, or commercial spaces in older buildings where internet reliability is anything but guaranteed, a single-network WiFi alarm system is not just inconvenient—it’s a liability.
That’s why the hybrid GSM WiFi alarm system has become the gold standard for professionals who refuse to accept “maybe it will work” as an answer. By intelligently combining the always-on reliability of cellular GSM/4G networks with the speed and smart-home integration of WiFi, you create a truly bulletproof alarm system that stays connected no matter what.
This comprehensive, step-by-step guide—drawn from over two decades of hands-on experience designing, installing, and optimizing thousands of burglar alarm systems across residential and commercial properties—walks you through building your own fail-safe hybrid GSM WiFi alarm system. You’ll learn how to evaluate your site’s unique challenges, select battle-tested components, configure intelligent automatic switching logic, and deploy a system that delivers uninterrupted protection. By the end, you’ll have the practical blueprint to eliminate offline vulnerabilities once and for all, turning unstable internet from a fatal weakness into a manageable footnote.
Whether you’re a hands-on facility manager responsible for multiple rental properties, a professional installer scaling your business, or an IT-savvy homeowner who demands enterprise-grade reliability, this guide is written for you. No fluff, no theory-only overviews—just actionable, tested strategies that deliver real-world results.
Why Pure WiFi Alarm Systems Fail When You Need Them Most
Let’s start with the brutal truth most manufacturers won’t admit: WiFi-only alarm systems are inherently fragile in real-world conditions. Internet service providers advertise “up to” speeds, but in practice, rural properties, multi-story buildings with thick walls, or areas prone to power fluctuations experience frequent drops, latency spikes, and complete outages. A 2025 industry survey of security integrators revealed that over 68% of false-negative alarm failures traced back to WiFi dependency during critical moments.
When the internet dies, so does remote notification, app control, and often the entire alarm communication path. Professional burglars know this—they time attacks during storms or known maintenance windows. Even minor interference from microwave ovens, baby monitors, or neighboring 2.4 GHz networks can jam signals long enough for an intruder to act.
A hybrid GSM WiFi alarm system solves this by maintaining two independent communication pathways:
- WiFi for high-speed app pushes, video integration, and smart-home automation when the network is stable.
- GSM/4G cellular as the unbreakable backup that operates independently of your local internet, using the same robust mobile networks that keep emergency calls alive during disasters.
The result? True redundancy. If WiFi drops, the system seamlessly shifts to GSM without missing a beat. SMS alerts, voice calls, and even app notifications continue uninterrupted. This isn’t marketing hype—it’s the same dual-path architecture trusted by banks, warehouses, and high-value residential estates worldwide.
How the Hybrid GSM + WiFi Architecture Delivers True “Never Offline” Protection
At the heart of a bulletproof setup is the intelligent interplay between the two networks. When WiFi is strong, the system prioritizes it for low-cost, high-speed data like real-time video feeds and instant app updates. The moment WiFi falters—whether from a router reboot, ISP outage, or interference—the GSM/4G module takes over instantly, routing critical alerts through cellular towers that rarely go down even in severe weather or power blackouts.
This dual-network design supports multiple independent alert channels simultaneously: app push notifications over WiFi, plus SMS, voice calls, and optional central station monitoring over GSM. Many systems also allow SMS or voice commands to arm/disarm the system remotely, giving you full control even when your local internet is completely offline. The result is a layered defense that professional security teams rely on for properties where downtime is simply not an option.

Core Components of a Bulletproof Hybrid GSM WiFi Alarm System
Building a reliable system starts with understanding the ecosystem. Here’s what you need:
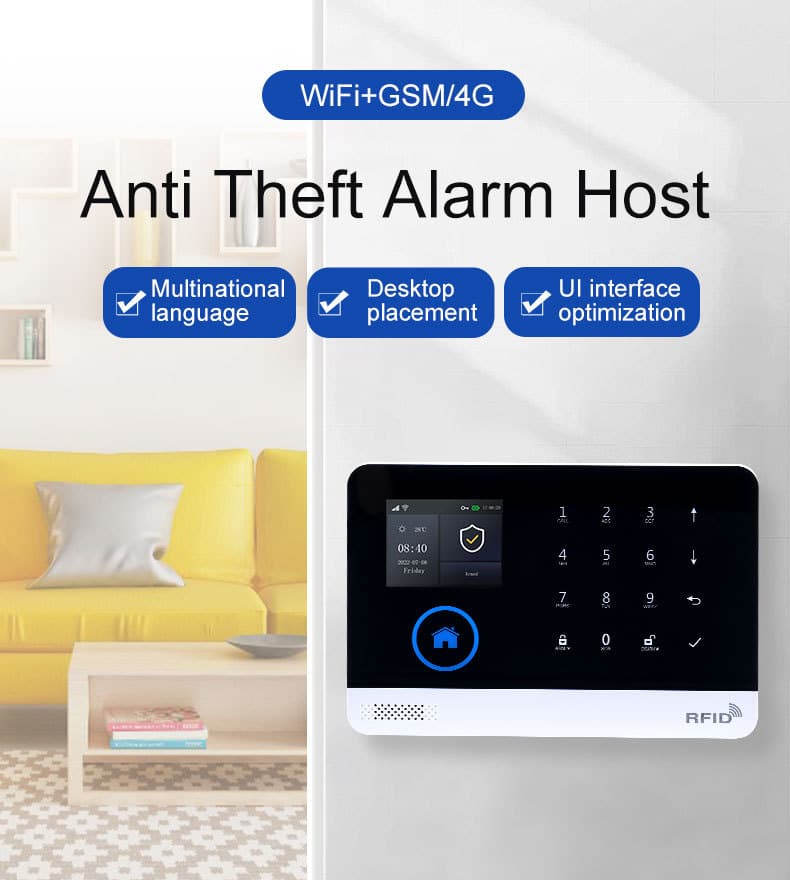
- Central Alarm Host/Panel – The brain. Choose a unit that natively supports simultaneous GSM/4G and 2.4 GHz WiFi (IEEE 802.11b/g/n). Look for models with a built-in 32-bit Cortex-M3 processor, multi-tasking OS, and at least 100 wireless zones. The panel must include a backup lithium battery (minimum 500mAh, typically 3.7V) and tamper protection. Compact units like the AS-6000 series (approx. 185×125×14.7 mm) with a clear 2.4-inch TFT display make setup and daily operation straightforward, offering menu hints and multi-language support (English, Spanish, French, and more).
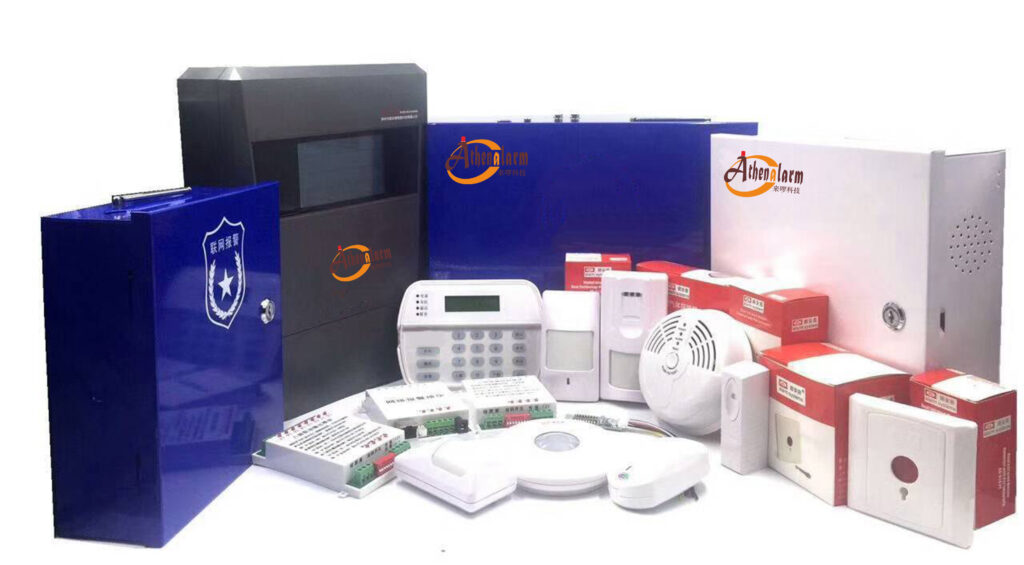
- Wireless Sensors – PIR motion detectors, door/window contacts, glass-break sensors, smoke/CO detectors, and environmental sensors (water leak, temperature). Operate on 433 MHz RF with EV1527 coding for long range and low interference, allowing up to 100 detectors to be learned into the system.
- Communication Modules – Integrated GSM/4G module (supporting bands like 850/900/1800/1900 MHz plus region-specific 4G LTE bands) plus WiFi chipset. Dual-SIM capability on premium panels adds another layer of carrier redundancy.
- Power Infrastructure – Primary DC5V adapter (micro USB) plus automatic failover to internal battery. Add a UPS or solar backup for off-grid properties. The system draws less than 120mA when working and under 80µA in standby, ensuring long runtime on backup power.
- Sirens and Output Devices – Indoor/outdoor wireless sirens (up to 50 dBm output) plus optional wired options for critical zones.
- Control Interfaces – RFID cards, key fobs, touchscreen panel, mobile app (TUYA-style or equivalent cloud platform), and SMS/voice command support. Up to 100 remotes and RFID cards can be programmed for convenient access.
- Optional Enhancements – IP cameras with local storage, external antennas for weak GSM areas, and integration with existing smart-home ecosystems via the TUYA platform for seamless accessory management and automated scenes.
These components work together as a layered defense. The hybrid architecture ensures that even if one path is compromised, the other remains fully operational.
Step 1: Conduct a Professional Site Survey for Signal Assessment
Never skip this—90% of hybrid system failures stem from poor initial planning.
Detailed Process:
- WiFi Assessment: Use a WiFi analyzer app (e.g., WiFi Analyzer on Android) or professional tool like Ekahau to map signal strength across the property. Target -65 dBm or better in all key zones. Note 2.4 GHz vs. 5 GHz compatibility—most alarm panels use 2.4 GHz only. Identify dead spots and sources of interference.
- GSM/4G Assessment: Insert a test SIM from at least two carriers. Check signal bars on the panel or use a dedicated signal tester. Aim for RSSI of -85 dBm or stronger. Walk the entire perimeter and interior, logging readings at sensor locations. Always verify that your chosen panel supports the exact GSM/4G bands used in your country or region to avoid compatibility issues.
- Power Reliability Audit: Log outage frequency using a plug-in power monitor. Measure backup battery runtime requirements (minimum 24 hours).
- Environmental Factors: Factor in building materials (concrete, metal roofing), weather patterns, and future expansions.
Document everything in a simple spreadsheet with photos. This data drives every subsequent decision and becomes your baseline for future troubleshooting.
Step 2: Selecting and Procuring the Right Hardware
Focus on systems explicitly marketed as dual-network GSM WiFi alarm systems with proven failover. Key evaluation criteria:
- Native support for automatic priority switching (WiFi primary, GSM secondary).
- Multi-channel alerts: APP push, SMS, voice call, and optional central station monitoring.
- Expandability to 100+ zones.
- Multi-language support and intuitive menus.
- Tamper alarms, power-failure alerts, and event logging (at least 100 records).
A solid starting point is a compact host like the AS-6000 series style units (approx. 185×125×14.7 mm) with TFT display, 433 MHz wireless coding, and built-in backup battery. Pair it with compatible PIRs, door contacts, and sirens. Budget $300–$800 for a complete starter kit, scaling up for commercial deployments.
Pro tip from the field: Always buy from suppliers who provide local frequency verification and offer firmware updates. Avoid generic no-name panels that lack proper encryption or reliable GSM modules. Confirm the unit includes a built-in lithium backup battery and tamper switch right out of the box.
Step 3: Detailed Installation and Pairing Steps
Physical Setup (30–60 minutes):
- Mount the alarm host centrally, away from metal surfaces, microwaves, and direct sunlight. Height: 1.5–2 meters for optimal signal.
- Insert SIM card(s) into the GSM slot(s). Power on via micro-USB 5V/1000mA adapter.
- Connect to WiFi via the host menu or dedicated app: Enter SSID and password. Confirm connection status on the TFT screen.
- Install backup battery if not pre-installed.
Pairing Wireless Devices (Critical for Reliability):
- Enter “learning mode” on the host (typically via menu or code like 70 + ENT).
- Trigger each sensor or remote within 30 seconds—the host beeps and assigns a zone. Label zones clearly (e.g., “Front Door – Entry/Exit”, “Living Room PIR – Indoor”).
- Program up to 100 remotes/RFID cards similarly.
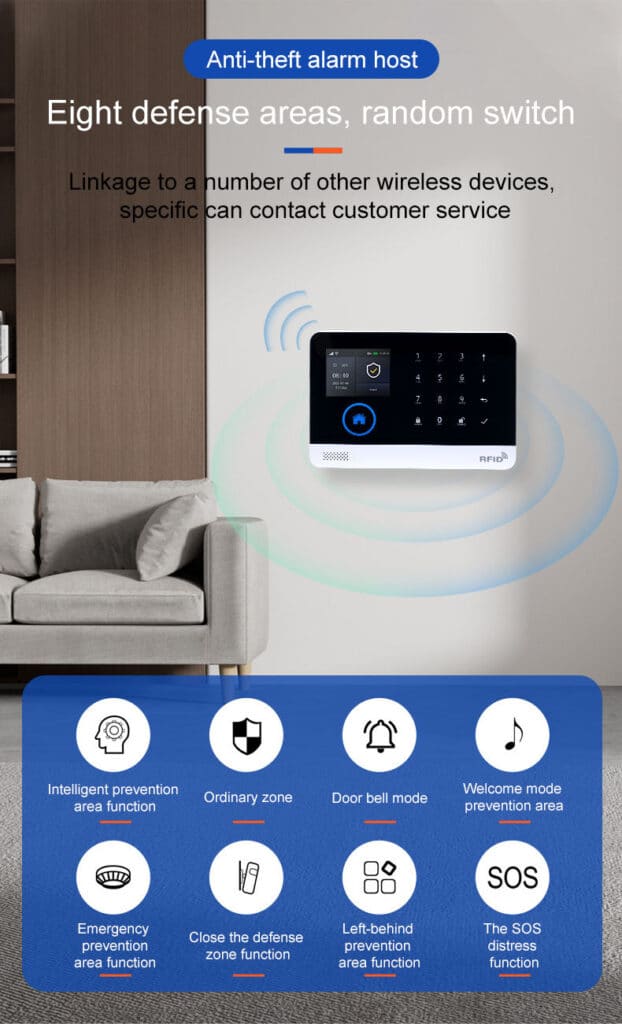
- Configure defense zones: Entry/Exit (with delay), 24-hour (always active), Perimeter, SOS, etc.
App Integration:
Download the companion app (cloud-based TUYA platform). Scan the QR code or enter host ID. Link the system for remote arm/disarm, live status, and push notifications. Set up 5 groups of preset phone numbers for SMS/voice alerts. The app also lets you manage all accessories, view real-time host status, and receive instant push alerts for any arm/disarm or alarm events.
Power and Tamper Configuration:
Enable main power malfunction alerts, low-battery warnings, and tamper detection. Test backup battery by unplugging the adapter—system should continue operating seamlessly. Set the internal clock via GSM network synchronization for accurate timing of scheduled operations.
Voice Message Setup (Essential for Voice Dialing):
Record a custom 20-second voice message directly on the host (e.g., “Alarm triggered at [Property Address]. Please respond immediately.”). This plays automatically during voice calls to preset numbers.
Step 4: Configuring Priority Link Strategies and Automatic Switching Logic
This is where the magic happens and what separates amateur setups from bulletproof professional systems.
Core Logic Setup:
- Primary Path: Set WiFi as default for faster push notifications and lower cellular data costs.
- Failover Trigger: Configure the panel to monitor WiFi heartbeat every 30–60 seconds. If connection drops for >90 seconds (adjustable), automatically switch to GSM/4G.
- Return-to-WiFi: Enable automatic reversion once WiFi stabilizes for 5 minutes to minimize cellular usage.
- Dual-SIM Redundancy (if available): Program SIM1 as primary cellular, SIM2 as auto-failover on different carriers.
Advanced Customization Steps (via App or Panel Menu):
- Access “Communication Settings.”
- Define alert channels: WiFi → APP push + local siren; GSM → SMS + voice call.
- Set timing: Exit delay 30–60 seconds, entry delay 20–45 seconds.
- Enable “intelligent logic analysis” so the system displays exact zone and sensor name on triggers.
- Activate timing arm/disarm schedules for routine operations.
- Record a 20-second custom voice message for auto-dialer (e.g., “Alarm triggered at [Property Address]. Please respond immediately.”).
Test the logic rigorously: Disable WiFi router deliberately and trigger a sensor. Verify instant switch to GSM and receipt of SMS/call. Restore WiFi and confirm reversion. Also test SMS and voice arm/disarm commands to ensure full control during outages.
Step 5: Layered Zone Configuration and Smart Integration
Create defense in depth:
- Perimeter Zones: Door/window contacts with immediate or delayed response.
- Interior Zones: PIRs set to “stay arm” (home mode) to protect while occupants are inside.
- 24-Hour Zones: Smoke, gas, carbon monoxide, water leaking—always active.
- SOS Zones: Panic buttons for immediate silent or audible response.
- Additional Custom Zones: Gate, bedroom, balcony, window-specific, and more for tailored protection.
Integrate with existing cameras or smart locks via the TUYA app for automated actions (e.g., motion trigger → camera recording + floodlights). The app’s user-friendly interface also allows remote parameter changes and accessory management without needing to be on-site.
Step 6: Comprehensive Testing, Troubleshooting, and Maintenance
Full System Validation Protocol:
- Arm/disarm via every method (app, RFID, remote, SMS).
- Simulate failures: Unplug internet, remove SIM, cut power.
- Trigger every sensor and verify notifications reach all preset numbers within 15 seconds.
- Check event logs daily for the first week.
Common Issues & Fixes:
- Weak GSM: Add external antenna or relocate panel.
- WiFi drops: Dedicated 2.4 GHz guest network or WiFi extender with wired backhaul.
- False alarms: Adjust PIR sensitivity, avoid heat sources, and test for pets or moving objects.
- Battery drain: Replace every 2–3 years; monitor low-battery alerts closely.
- No app connection: Double-check WiFi credentials and ensure the host is registered correctly in the TUYA app.
Establish a quarterly maintenance schedule: signal re-check, battery test, firmware update, sensor cleaning. Log every event and review monthly to catch patterns early.
Real-World Deployments: Lessons from the Field
In a recent coastal vacation home project with frequent ISP outages, the hybrid system maintained 100% uptime during a 72-hour blackout. GSM handled all alerts while owners received clear app status updates upon restoration. A commercial warehouse with metal roofing used dual-SIM + external antennas to overcome signal challenges—zero downtime in two years of operation. Small retail shops in older urban buildings have similarly reported dramatic reductions in missed alarms after switching to this setup, with the TUYA app providing instant visibility even during peak business hours.
These aren’t lucky breaks. They’re the direct result of the methodical hybrid approach outlined here.

Scaling and Future-Proofing Your GSM WiFi Alarm System
For larger properties, add repeaters, multiple hosts networked together, or central monitoring station integration via CID protocol. Stay ahead of threats with regular firmware updates and encryption checks. The system’s expandability to 100+ zones and accessories makes it easy to grow as your needs evolve—whether adding more sensors or integrating additional smart-home devices.
Conclusion: Take Control of Your Security Today
A properly built hybrid GSM WiFi alarm system isn’t just an upgrade—it’s the definitive solution for anyone facing unstable internet. It delivers the peace of mind that comes from knowing your property is protected 24/7, regardless of broadband whims.
You now have the complete playbook. Implement these steps, test relentlessly, and you’ll own a system that professionals envy. If you’re procuring in volume for multiple sites, need custom configurations, or want pre-vetted components with full support, reach out to our team. We specialize in helping security decision-makers and installers deploy exactly these bulletproof solutions at scale.
Your properties deserve protection that never sleeps. Build it right the first time.